
🍰 Healthy No Bake Cheesecake Jars — Creamy, Guilt-Free Dessert in Individual Jars 🍓
1. Introduction
When you want a dessert that feels indulgent but stays light, this Healthy No Bake Cheesecake Jars recipe hits the sweet spot. Silky cream cheese mingles with vanilla, lemon zest, and a crisp crumble that echoes a classic graham crust. Each jar layers creamy filling with bright berries, designed for quick assembly and zero-fuss chilling. This is comfort, without the oven heat or heavy aftertaste.
As you bite in, you’ll notice the balance of tang and sweetness, the way the crust gives a gentle snap and the filling stays lush and airy. It’s a dessert you can pull from the fridge in minutes for unexpected guests or a weeknight treat. For more comforting bites, you can also explore our Soft Chocolate Chip Milk Buns and other quick desserts on the blog.
2. Why You’ll Love This Recipe
- Ready in about 20 minutes plus chill time for a set texture.
- Portion-controlled jars ideal for meal prep and portion control.
- No oven required, making it perfect for warm days or small kitchens.
- Customizable toppings and crust textures to suit any season.
3. Ingredient Notes
The filling uses cream cheese, a touch of yogurt for extra creaminess, vanilla, lemon zest, and a light sweetener. Choose full-fat cream cheese for a rich, velvety texture; reduced-fat works too but may yield a lighter mouthfeel. Fresh lemon zest highlights the tang, while vanilla adds warmth. If you’re watching sugar, swap part of the sweetener for honey or maple syrup for a natural finish.
The crust comes from crushed graham crackers or digestive biscuits bound with melted butter. For a gluten-free option, try almond flour or gluten-free biscuits. If you want to pair this dessert with a comforting main, our Creamy Dijon Chicken with Vegetables pairs nicely, and you can also explore our Healing Greek Immune-Boosting Soup for a cozy start or side.
4. Kitchen Tools You Need
Having the right tools makes these jars come together quickly and smoothly. Here are a few reliable picks that fit the job nicely:
- KitchenAid Artisan 5-Quart Stand Mixer — This sturdy mixer makes light work of beating cream cheese until perfectly fluffy, preventing the filling from becoming grainy.
- Deluxe 33-Piece Silicone Utensil Set — Scrape, scoop, and fold with ease; these flexible tools help you get every bit of filling from the bowl and jars.
- Compact 6-in-1 Digital Air Fryer — While this dessert is no-bake, a compact air fryer can be handy for crisping edges or reheating jars evenly if you ever want to serve warm-ish bites.
5. How to Make Healthy No Bake Cheesecake Jars
5.1 Phase 1 — Prep the crust
Crush crackers or biscuits into fine crumbs and mix with a little melted butter until the texture resembles wet sand. Press a tablespoon or so into the bottom of each jar to form a thin, even crust. The goal is a gentle crunch that supports the creamy filling without overpowering it.
5.2 Phase 2 — Beat the filling
Soften the cream cheese to room temperature, then beat until silky and free of lumps. Fold in a touch of yogurt (if using), vanilla, and lemon zest for brightness. Taste and adjust sweetness to your preference, keeping in mind the fruit topping will add a natural sweetness too.
5.3 Phase 3 — Layer and chill
Spoon the filling into the jars in two or three layers, adding a little fruit or jam between layers if you like. Finish with a final dollop of filling and a sprinkle of zest or berries. Chill the jars for at least 2 hours, or overnight, to let the filling set and flavors meld.
5.4 Phase 4 — Serve and toppings
When ready to serve, top with fresh berries, a berry compote, or a light drizzle of honey. The contrast between the cool, creamy filling and the bright fruit is what makes this dessert sang. For bonus flavor, a few mint leaves can add a refreshing note.
6. Expert Tips for Success
- Let dairy ingredients come to room temperature before mixing to avoid a stiff filling.
- Beat the cream cheese until smooth, then lightly fold in any yogurt or cream to keep the mixture airy.
- Do not over-mix once you add the final ingredients; overmixing can introduce air that destabilizes the set.
- Chill times are non-negotiable for a clean set; plan ahead or make them the night before.
- Use fresh lemon zest rather than juice alone to keep the filling bright and aromatic.
7. Variations & Substitutions
- Make it dairy-free by using full-fat coconut cream and a plant-based cream cheese alternative. Add a little lemon zest for brightness.
- Crust alternatives: swap the cookies for crushed almonds mixed with a touch of coconut oil for a nutty, gluten-free option.
- Flavor twists: fold in cocoa powder for a chocolate cheesecake, or swirl in berry compote for marbled jars.
- Sweetener swaps: use a small amount of maple syrup or honey instead of sugar to add depth.
- Portion ideas: use mason jars of various sizes for a layered, visually appealing presentation.
8. Storage & Reheating
Store the assembled jars in the refrigerator, covered, for up to 3-4 days. They’re best enjoyed within a couple of days for peak texture. Do not freeze the filled jars frequently, as the filling can become grainy and the crust can lose its crunch. If you must freeze, freeze the filling separately and reassemble with fresh crust after thawing.
9. FAQ
Q: Is this Healthy No Bake Cheesecake suitable for beginners?
A: Yes. The no-bake format keeps things simple—softened cream cheese, a quick crust, and a chill time are all you need to master this dessert.
Q: Can I make this dairy-free?
A: Absolutely. Use dairy-free cream cheese and coconut cream in place of dairy products, and adjust sweetness to taste.
Q: Do the jars need to chill overnight?
A: Chilling for at least 2 hours is ideal, but overnight yields the best texture and flavor melding.
Q: Can I customize the crust and toppings?
A: Yes. Try almond flour crusts, gluten-free biscuits, or a mix of fresh berries and a glossy fruit topping for different textures and flavors.
10. Conclusion
Healthy No Bake Cheesecake Jars offer a bright, creamy finish to any meal with minimal effort. The layers stay distinct, the flavors stay fresh, and you can tailor every jar to your mood or guests’ dietary needs. Save this recipe for a quick dessert that delivers big on both taste and satisfaction, and don’t hesitate to experiment with toppings and crusts to keep it exciting week after week.
Print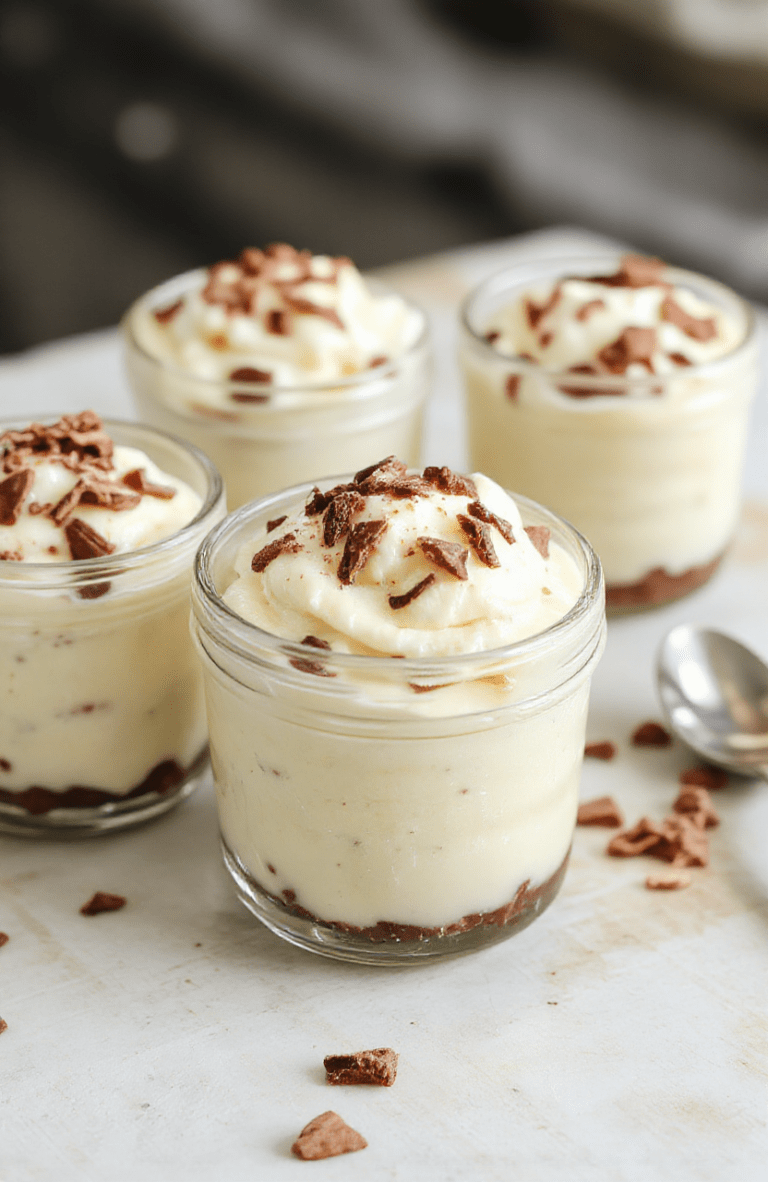
Healthy No Bake Cheesecake Jars
A light, indulgent no-bake cheesecake in individual jars with a crunchy crust, creamy filling, and berry topping. Perfect for portion-controlled indulgence and easy entertaining.
- Total Time: 15 mins + 2 hours chill
- Yield: 4 jars 1x
Ingredients
- 1 cup graham cracker crumbs
- 2 tablespoons unsalted butter, melted
- 8 oz cream cheese, softened
- 1/2 cup Greek yogurt
- 1/4 cup powdered sugar
- 1 teaspoon vanilla extract
- 1 tablespoon fresh lemon juice
- 1/4 cup heavy whipping cream (optional)
- Fresh berries for topping
Instructions
- Mix graham cracker crumbs with melted butter and press into the bottom of four small jars.
- Beat cream cheese until smooth, then blend in Greek yogurt, powdered sugar, vanilla, and lemon juice until creamy.
- Whip the cream (if using) and fold into the filling until light and fluffy.
- Spoon filling into jars, chill for at least 2 hours until set, and top with fresh berries before serving.
Notes
- Ensure cream cheese is fully softened for a silky texture.
- Chill time is essential for a firm set; adjust based on your fridge.
- For a dairy-free version, substitute with dairy-free cream cheese and yogurt.
- Experiment with toppings like raspberries, kiwi, or mango.
- Prep Time: 15 mins
- Cook Time: 0 mins
- Method: No bake, chill until set
- Cuisine: American
- Diet: Vegetarian
Nutrition
- Serving Size: 1 jar (approx. 120 g)
- Calories: 220 Kcal
- Sugar: 14 g
- Sodium: 120 mg
- Fat: 14 g
- Saturated Fat: 9 g
- Unsaturated Fat: 4 g
- Trans Fat: 0 g
- Carbohydrates: 18 g
- Fiber: 1 g
- Protein: 6 g
- Cholesterol: 60 mg
