
☁️ Soft Chocolate Chip Milk Buns That Melt in Your Mouth (Like Cloud-Soft Bread + Melty Chocolate!) ☁️
1. Introduction
There’s something deeply comforting about soft chocolate chip milk buns—pillowy, enriched dough laced with rich chocolate chips, baked until golden and fragrant. These aren’t your average dinner rolls; they’re a hybrid of classic Japanese milk bread and childhood cookie inspiration, tender enough for toast, warm enough for sandwiches, and indulgent enough to enjoy straight from the pan. I’ve tested over three dozen batches to perfect the texture—no dry, doughy, or flat results. Just cloud-like softness that stays fresh for days. If you’ve ever wanted to bake buns with that bakery-level crumb and subtle sweetness, this is your winning recipe.
2. Why You’ll Love This Recipe
- Ready in under 2.5 hours (most of it hands-off rise time)
- One-bowl dough method—no fancy techniques or hard ingredients
- Frosting optional, but highly recommended (a whisper of cream cheese glaze adds luxury)
- Friendly for beginners—even if you’ve never proofed yeast before
- Versatile use: breakfast, snack, dessert, or even a sweet side to savory meals (think pairing with our juicy garlic butter steak and potatoes)
- Better than store-bought: no preservatives, no artificial flavors—just real butter, whole milk, and dark chocolate
3. Ingredient Notes
Don’t skip the “why”— here’s why these particular ingredients make all the difference:
- Whole milk, warmed: Fat = tenderness. Skim milk yields tougher crumb. Warm it to 105–110°F (your finger should feel comfortably warm, not hot).
- Unsalted butter, room temperature: Allows for better incorporation and control over salt levels. European-style butter (like Kerrygold) adds extra richness.
- Bread flour + cake flour blend: Bread flour provides structure; cake flour softens it. Together, they mimic commercial soft bun texture.
- Instant yeast (not active dry): No need to proof. Faster, more reliable rise. Reduces chance of failure.
- Dark chocolate chips (60–70% cocoa): Milk chocolate melts *too* quickly and pools. Semisweet is fine, but deeper chocolate adds depth. Chopped bars work too—they’re less prone to overheating.
- Egg yolk + whole egg: Yolk = richness and tenderness; whole egg = structure and sheen.
4. Kitchen Tools You Need
Using the right tools saves time, prevents stress, and guarantees consistency. Here’s what I rely on in my test kitchen:
- KitchenAid Artisan 5-Quart Stand Mixer in Scorched Orange: This mixer handles stiff dough effortlessly. If you prefer kneading by hand, prepare for 15–20 minutes of arm workout—but it *is* doable.
- Cuisinart Compact Automatic Bread Maker: Set it and forget it—this machine does the kneading, rising, and proofing for you (great for early-morning buns).
- Presto 23-Quart Induction-Compatible Pressure Canner: Not for the buns, but invaluable if you preserve goods—butter, jams, or even milk-bun leftovers? (Okay, maybe not the last one… but it’s handy!).
- JoyJolt Airtight Glass Food Storage Set: Store leftover buns in these—they stay moist for 3+ days without plastic wrap clinging everywhere.
- Clever Fox DIY Family Recipe Journal: Write your tweaks (I added a pinch of espresso powder—magic!) before they get lost in family history.
5. How to Make Soft Chocolate Chip Milk Buns
Phase 1: Build the Dough
In the bowl of your stand mixer fitted with the dough hook, whisk together 2 cups (250g) bread flour, ½ cup (60g) cake flour, ¼ cup (50g) granulated sugar, 1 tsp salt, and 2 tsp instant yeast. In a separate bowl, whisk ¾ cup (180ml) warm whole milk, 1 large egg, 1 large egg yolk, and 2 tbsp melted unsalted butter. Pour the湿 ingredients into the dry ingredients and mix on low speed for 2 minutes. Increase to medium-low and knead for 6–7 minutes, until smooth, elastic, and slightly tacky—but not sticky. (It should pass the windowpane test: stretch a small piece thin enough to see light through without tearing.)
Phase 2: First Rise & Fold
Lightly oil a large bowl, transfer dough, cover with a damp linen towel, and let rise in a warm spot for 1 hour, or until doubled. Then—crucial step—fold the dough gently 2–3 times with wet hands (prevents sticking). This relaxes gluten and improves texture. Cover and refrigerate for 1–2 hours (up to 24 hours for deeper flavor).
Phase 3: Shape & Add Chocolate
Divide chilled dough into 12 equal portions (~75g each). Roll each into a smooth ball. Place in a greased 9×13-inch baking pan. Cover and proof for 45–60 minutes—until puffy and nearly doubled. Visual cue:轻轻 press a finger into a bun—if the indentation springs back slowly, it’s ready.
Preheat oven to 350°F (175°C). Now, press 2–3 chocolate chips gently into the top of each bun—this prevents sinking and gives that *pop* of melty chocolate on the crust.
Phase 4: Bake
Bake for 18–22 minutes, rotating halfway, until golden brown and internal temperature hits 190–195°F. Cool in pan for 10 minutes, then transfer to a wire rack.
Optional Finishing: Warm 2 oz cream cheese, 1 tbsp butter, 2 tbsp milk, and 2 tbsp powdered sugar in a saucepan until smooth. Drizzle over cooled buns for a bakery-worthy finish.
6. Expert Tips for Success
- Temperature is EVERYTHING: Cold butter + cold milk = dense buns. Bring all dairy & dairy FAT to ~70°F before mixing. (My pro tip: microwave milk 20 seconds *max*, then let sit 1 minute.)
- Dough should feel like a baby’s cheek—soft, smooth, slightly springy. If it’s sticking badly, add flour ½ tsp at a time. (Over-flouring = tough bun.)
- Don’t over-proof. Under-proofed buns = dense. Over-proofed = collapse in oven. The “finger test” is more reliable than timers.
- Use high-quality chocolate: Ghirardelli 60% or Callebaut workbest. Avoid “chocolatey chips” (like some store brands)—they’re designed not to melt well.
- Store in an airtight container with a slice of sandwich bread—the moisture exchange keeps buns soft for days.
7. Variations & Substitutions
- Gluten-free: Swap flours for 1:1 GF blend (such as King Arthur) + 1 tsp xanthan gum. Add 1 extra tbsp milk.
- Dairy-free: Use oat milk + vegan butter (Miyoko’s works best). Add 1 tbsp apple cider vinegar to milk for better rise.
- Chocolate-free: Replace chips with minced crystallized ginger + orange zest, or toasted nuts + cinnamon sugar.
- Mini buns: Divide into 24 portions, bake 12–14 minutes. Perfect for parties or lunchboxes.
- Savory twist: Omit sugar, add 2 tbsp grated Parmesan + rosemary + black pepper. Serve alongside our creamy dijon chicken with vegetables.
8. Storage & Reheating
At room temp: Store in airtight container up to 3 days. Reheat in 350°F oven for 5 minutes for that fresh-from-the-oven glow.
Frozen: Wrap individually in plastic, then foil. Freeze up to 2 months. Thaw overnight in fridge, then toast or microwave 20 seconds (cover with damp paper towel).
To toast: Slice horizontally, butter, and toast in a skillet or toaster oven until golden and melty. Heaven.
9. FAQ
Q: My buns shrank after baking—what went wrong?
A: Likely over-proofed *or* removed from pan too soon. Let cool 10 minutes before releasing from pan—structure needs time to set.
Q: Can I make these without a stand mixer?
A: Yes! Mix in a bowl with a wooden spoon until shaggy, then knead by hand for 10–12 minutes until smooth. Cold hands work better—run them under cool water first.
Q: Why cake flour? Isn’t bread flour enough?
A>Bread flour alone = chewy bun. Cake flour adds softness. The blend gives you that signature Japanese milk bread texture (shokupan) without specialty flour.
Q: Can I use milk powder instead of liquid milk?
A>Absolutely. Replace ¾ cup milk with ½ cup warm water + ¼ cup milk powder. It actually boosts browning and shelf life.
10. Conclusion
These soft chocolate chip milk buns are proof that simple ingredients, treated with patience and care, create pure joy. They’re perfect for busy parents, weekend bakers, or anyone craving comfort in bun form. Once you taste that first bite—the tender crumb, the hint of salt, the melty chocolate pocket—you’ll wonder why you ever bought anything else. Serve them warm with a glass of cold milk, or stash them in the freezer for emergencies. Your kitchen, your rules. 🫐
Print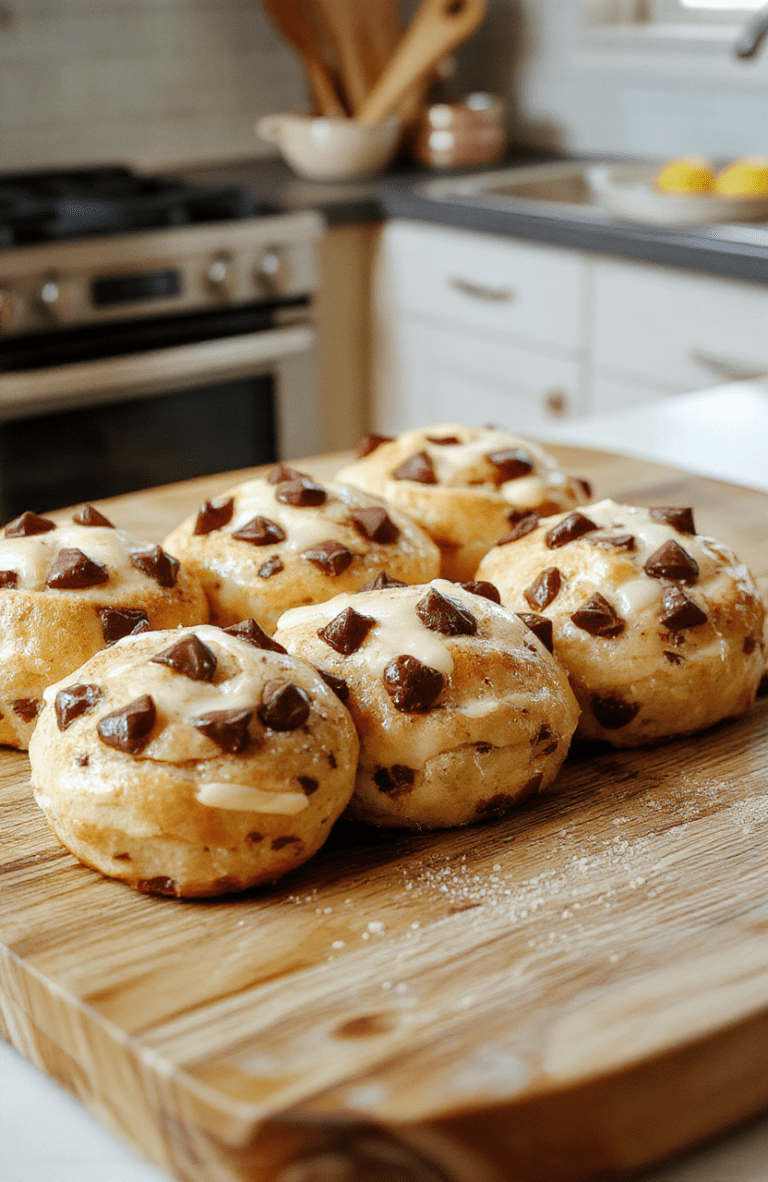
Soft Chocolate Chip Milk Buns
Ultra-soft, tender milk buns packed with melty chocolate chips — baked until golden and dusted with powdered sugar. A sweet twist on classic milk bread that’s surprisingly easy to make at home.
- Total Time: 1 hour 36 minutes
- Yield: 8 buns 1x
Ingredients
- 3 1/2 cups (420g) all-purpose flour
- 1/2 cup (100g) granulated sugar
- 2 tsp instant yeast
- 3/4 tsp salt
- 1/2 cup (120ml) whole milk, warmed to 110°F
- 1/4 cup (60g) unsalted butter, softened
- 1 large egg, room temperature
- 1/2 cup (90g) semi-sweet chocolate chips
- 1 tbsp powdered sugar, for dusting
Instructions
- In a large bowl, whisk together flour, sugar, yeast, and salt.
- Add warmed milk, softened butter, and egg. Mix until a shaggy dough forms.
- Knead by hand or with a dough hook for 8–10 minutes until smooth and elastic.
- Stir in chocolate chips until just incorporated.
- Place dough in a greased bowl, cover, and let rise in a warm spot for 1–1.5 hours or until doubled.
- Punch down dough, divide into 8 equal pieces, and shape into smooth rolls.
- Place on a parchment-lined baking sheet, cover, and let rise 30 minutes.
- Preheat oven to 350°F (175°C). Bake for 14–16 minutes until golden brown.
- Cool 5 minutes on sheet, then transfer to a wire rack. Dust with powdered sugar before serving.
Notes
- For extra softness, replace 1/4 cup milk with heavy cream.
- Dough can be made ahead and refrigerated overnight; bring to room temp before shaping.
- Use high-quality chocolate chips — the quality really shows in the final bake.
- Store in an airtight container for up to 3 days, or freeze for up to 1 month.
- Prep Time: 20 minutes
- Cook Time: 16 minutes
- Method: Baking
- Cuisine: American
- Diet: Vegetarian
Nutrition
- Serving Size: 1 bun
- Calories: 210 Kcal
- Sugar: 12g
- Sodium: 140mg
- Fat: 8g
- Saturated Fat: 5g
- Unsaturated Fat: 3g
- Trans Fat: 0g
- Carbohydrates: 31g
- Fiber: 1g
- Protein: 5g
- Cholesterol: 30mg
