
🥜 Creamy Peanut Butter Oat Cups No Bake Treat 🥜
1. Introduction – Peanut Butter Oat Cups
These peanut butter oat cups are a no bake treat that hits all the right notes: creamy, nutty, and lightly chewy. The combination of smooth peanut butter with oats creates a satisfyingly textural bite that feels indulgent yet simple. If you’ve been craving a no bake snack that doubles as healthy no bake treats, you’ve just found your new favorite bite.
The aroma of toasted oats, vanilla, and a kiss of sea salt will lure you back for another cup. While they’re firm enough to hold their shape, they melt slightly on the tongue, revealing the creamy peanut butter core. Best of all, they come together in minutes and chill into perfect, kid-friendly portions.
2. Why You’ll Love This Recipe
- Ready in about 20-25 minutes, plus chilling time—no oven required.
- One-bowl prep keeps cleanup quick and easy.
- Versatile for any diet when using gluten-free oats and vegan sweeteners.
- Make-ahead friendly ideal for meal prep, snacks, or on-the-go treats.
- Customizable add chocolate chips, cranberries, or toasted coconut for extra texture.
3. Ingredient Notes
Key ingredients provide the right balance of flavor and binding. Use rolled oats for chew and staying power; steel-cut oats will be too chewy and quick oats can turn mushy. For the creamy center, choose natural peanut butter (stir well if separation occurs) or substitute with almond butter for a different twist. A touch of vanilla extract and a pinch of salt elevate the sweetness and round out the nutty notes.
Sweetening is flexible: maple syrup keeps these cups vegan, while honey adds a floral depth. If you want them a touch richer, whisk in a teaspoon of coconut oil to help the mixture set glossy and smooth. For texture, fold in mini chocolate chips or chopped peanuts.
Want more snack ideas? Try our Healthy Chocolate Protein Muffins for a Quick Snack for a different, equally satisfying treat. If you’re planning a quick weeknight, our 15-minute Big Mac Wraps are a fabulous contrast in texture and flavor.
4. Kitchen Tools You Need
These tools make the no bake process smoother and help you portion, chill, and store the cups with ease. If you already own some of these, you’ll recognize how they shave minutes off the prep.
- Compact 6-in-1 Digital Air Fryer by Amazon Basics — While these cups are no bake, a compact air fryer can be handy for quick cooling and short-term chilling in warm weather, keeping the cups firm without melting.
- KitchenAid Artisan 5-Quart Stand Mixer in Scorched Orange — Use the paddle attachment to mix creamy peanut butter, maple syrup, and vanilla until glossy and smooth, especially if you’re doubling the batch.
- Deluxe 33-Piece Silicone Utensil Set — Flexible spatulas and scrapers make scraping every last bit of that sticky mixture from bowls a breeze.
- JoyJolt Airtight Glass Food Storage Set — Perfect for storing any leftover cups or prepping a batch ahead for the week.
- Ninja Smart Double Oven with FlexDoor Technology — If you’re baking or reheating menu staples, this all-in-one oven makes weeknight cooking a breeze, freeing up your time for no bake treats.
5. How to Make Creamy Peanut Butter Oat Cups
Phase 1 — Gather & Mix
In a medium bowl, stir together peanut butter, maple syrup (or honey), vanilla, and a pinch of salt until the mixture is smooth and glossy. Add rolled oats and stir until every oat is lightly coated. The mixture should be thick but scoopable, with a faint aroma of peanut and vanilla.
Phase 2 — Scoop, Shape & Layer
Line a mini muffin tin with paper liners or silicone cups. Scoop about 1 heaped tablespoon of mixture into each cup and press firmly to compact. If you’re adding chocolate chips, sprinkle a few into the center so the cups reveal a hidden, melty center as they chill.
Tip: For a cleaner finish, use a small spoon or a silicone spatula to smooth the tops and create a neat edge around each cup. The edges should look glossy and hold their shape when you lift them from the tin.
Phase 3 — Chill & Set
Chill the cups in the refrigerator for 20-30 minutes, or until they’re set and firm to the touch. If you’re in a hurry, you can speed this up with a quick 10-minute stint in a chilled layer of the freezer, but monitor them so they don’t freeze solid.
Phase 4 — Optional Finish
For a pretty finish, drizzle a thin line of melted dark chocolate over the tops or sprinkle with toasted coconut. Serve straight from the fridge for the best texture—the oats stay chewy, and the peanut butter remains luxuriously creamy.
6. Expert Tips for Success
- Use natural peanut butter with just peanuts and a touch of salt for the best flavor. If the peanut butter is oil-heavy, stir it first to prevent separation in the cups.
- To ensure perfect binding, lightly heat the peanut butter mix in short bursts (if needed) until it’s easy to stir but not runny.
- If the mixture is too dry, add a teaspoon of water or a touch more maple syrup until it comes together. If it’s too wet, add a tablespoon of oats and mix until the dough holds its shape.
- Line your muffin cups with parchment or silicone liners to prevent sticking and make unmolding a breeze.
- Chill time is non-negotiable for clean edges. If you skip it, you’ll have softer cups that don’t hold their shape as well.
- Want to cut sugar without sacrificing flavor? Use creamy peanut butter, a splash of vanilla, and a drizzle of maple syrup to maintain sweetness with fewer additives.
7. Variations & Substitutions
- Swap the peanut butter for almond butter or cashew butter for a different nutty profile. Healthy no bake treats can be built around any nut butter you love.
- Make them dairy-free by using maple syrup instead of honey and choosing dairy-free chocolate chips for a topping.
- For a chocolate lover’s version, fold in mini dark chocolate chips or drizzle melted chocolate on top after chilling.
- Gluten-free option: use certified gluten-free oats to keep these cups friendly for gluten-sensitive eaters.
- Try fruity add-ins like dried cranberries or chopped dried apricots for a sweet-t chewy counterpoint to the peanut butter.
8. Storage & Reheating
Store the cups in an airtight container in the refrigerator for up to 1 week. For longer storage, freeze the cups in a single layer on a parchment-lined tray for 1-2 hours, then transfer to a freezer bag for up to 2 months. There’s no need to reheat—enjoy them cold for a refreshing treat, or let them soften slightly at room temperature if you prefer a creamier bite.
9. FAQ
Q: Are peanut butter oat cups healthy?
A: They can be a smart, balanced snack when made with wholesome ingredients like rolled oats, natural peanut butter, and a modest amount of maple syrup. They’re a no bake snack that satisfies a sweet craving without loaded sugar or heavy dairy.
Q: Can I freeze them?
A: Yes. Freeze in a single layer, then transfer to an airtight container. They keep well for up to 2 months and thaw quickly at room temperature or in the fridge.
Q: Are these gluten-free?
A: They can be gluten-free if you use certified gluten-free oats. Always check labels to ensure there’s no cross-contamination and to match your dietary needs.
Q: What if the mixture is too dry or too wet?
A: For dryness, add a splash of maple syrup or a teaspoon of water and mix. For wetness, add a tablespoon of oats at a time until the dough comes together and holds its shape.
Q: Can I customize the toppings?
A: Absolutely. Chocolate chips, shredded coconut, chopped nuts, or dried fruit all work beautifully. It’s a great place to experiment with flavors you love.
10. Conclusion
Creamy Peanut Butter Oat Cups are a delightful no bake treat that’s easy to customize and perfect for meal-prep. With a few pantry staples, you can whip up a batch that tastes indulgent while staying simple and wholesome. Try different nut butters, toppings, and add-ins to make this recipe your own, and enjoy a satisfying snack that you’ll reach for again and again.
Print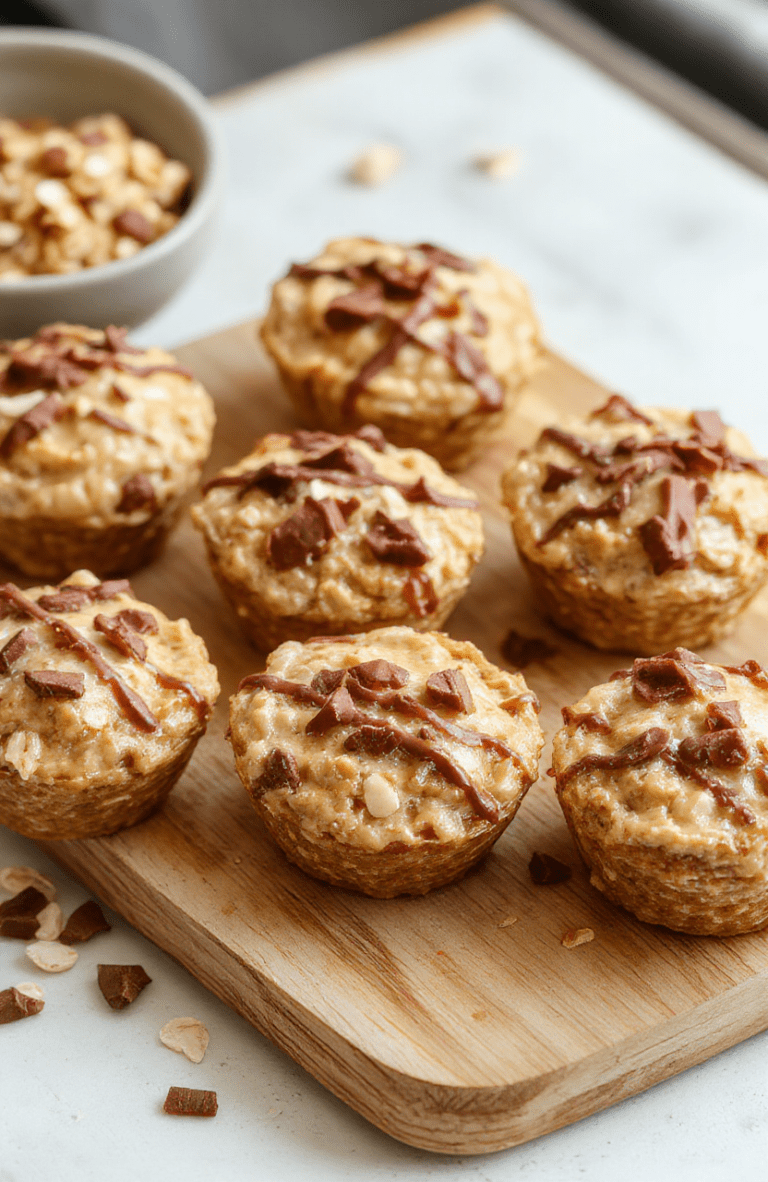
Creamy Peanut Butter Oat Cups No Bake Treat
No-bake peanut butter oat cups blend creamy peanut butter with chewy oats to create bite-sized treats that set in the fridge. A quick, kid-friendly snack perfect for lunchboxes or a small dessert.
- Total Time: 30 minutes (including chill time)
- Yield: 12 servings 1x
Ingredients
- 1 cup creamy peanut butter
- 1/2 cup honey or maple syrup
- 2 cups rolled oats
- 1/2 cup mini chocolate chips (optional)
- 1/4 cup coconut oil, melted
- Pinch of salt
Instructions
- Line a muffin tin with liners.
- In a large bowl, mix peanut butter, honey, melted coconut oil, and salt until smooth.
- Stir in oats and chocolate chips until combined.
- Scoop into liners and flatten to form cups; refrigerate 20–30 minutes until set.
- Enjoy as a quick snack or dessert; drizzle with extra peanut butter if desired.
Notes
- Chill time helps cups hold their shape; longer chill yields firmer cups.
- Substitute almond butter for a different flavor.
- For vegan option, use maple syrup and vegan chocolate chips.
- Store in the fridge for up to 1 week.
- Prep Time: 15 minutes
- Cook Time: 0 minutes
- Method: No-Bake
- Cuisine: American
- Diet: Vegetarian
Nutrition
- Serving Size: 1 cup
- Calories: 120 Kcal
- Sugar: 6 g
- Sodium: 60 mg
- Fat: 8 g
- Saturated Fat: 2 g
- Unsaturated Fat: 6 g
- Trans Fat: 0 g
- Carbohydrates: 10 g
- Fiber: 2 g
- Protein: 4 g
- Cholesterol: 0 mg
