🍞🧈 Easy Flaky Cheese Danish Pastry — Your cheese danish recipe for bakery-style brunch at home
1. Introduction
Immerse your senses in the warmth of a freshly baked cheese danish pastry. This easy flaky cheese danish pastry recipe delivers bakery vibes with every bite. The dough folds create buttery layers that crackle at the edges while the cheese filling oozes just enough to entice. It’s a confident recipe that still stays approachable, making weekend brunch feel celebratory and effortless. This cheese danish recipe is designed for home bakers who crave restaurant-quality pastry without the fuss.
2. Why You’ll Love This Recipe
- Ready in about 60 minutes, including assembly and bake time.
- Bakery-style flaky layers achieved with easy-to-use puff pastry or laminated dough.
- Creamy, tangy cheese center with optional herbs for savory depth.
- Perfect for weekend brunch, family breakfasts, or a lux snack anytime.
For more flaky pastry inspiration, explore our flaky pastry breakfast ideas.
3. Ingredient Notes
Store-bought puff pastry is a reliable shortcut that still yields these stunning, crispy layers. If you prefer from-scratch, a laminated dough will give you a deeper, richer bite, though it requires a bit more time and patience. For the filling, use full-fat cream cheese blended with a touch of sour cream or yogurt for creaminess, then fold in sharp cheddar or Gruyère for a bakery-like tang.
Quality ingredients make a big difference. Choose unsalted butter for clean, sweet butteriness and a cheese blend that melts smoothly. A pinch of sugar in the filling enhances the natural tang without turning it sweet. If you’re curious about other comforting breakfasts, you might enjoy our Creamy Peanut Butter Oat Cups or Fluffy Oatmeal Crepes as pairings or add-ons.
If you want a quick, savory pairing alongside this pastry, try a dish from our Creamy Chicken Alfredo Pizza recipe linked here: Creamy Chicken Alfredo Pizza — Family Favorite.
4. Kitchen Tools You Need
Equipping your kitchen with the right tools makes this cheese danish pastry feel effortless. A sturdy mixer speeds up dough handling, while a reliable oven helps you nail the perfect bake every time.
- KitchenAid Artisan 5-Quart Stand Mixer in Scorched Orange — for easy dough mixing and folding, ensuring tender, laminated layers. Check price
- Cuisinart Compact Automatic Bread Maker — a handy option to proof dough or create a starter without intense hands-on time. See details
- Compact 6-in-1 Digital Air Fryer by Amazon Basics — great for finishing and crisping, if you want a quick, golden edge without turning on a full oven. Shop now
- Ninja Air Fryer Pro Crisp & Roast 4-in-1 — adds a versatile finishing option to get extra crunch on the pastry without extra oil. Buy
Want more inspiration while you bake? Our flaky pastry posts pair nicely with these picks and other kitchen gear such as the Ninja 12-in-1 Smart Double Oven with FlexDoor & Air Fry for trial runs on multiple trays. If you’re stocking up for broader baking projects, you can also browse our home-cook toolkit at these links: One-pan beef dinner and more.
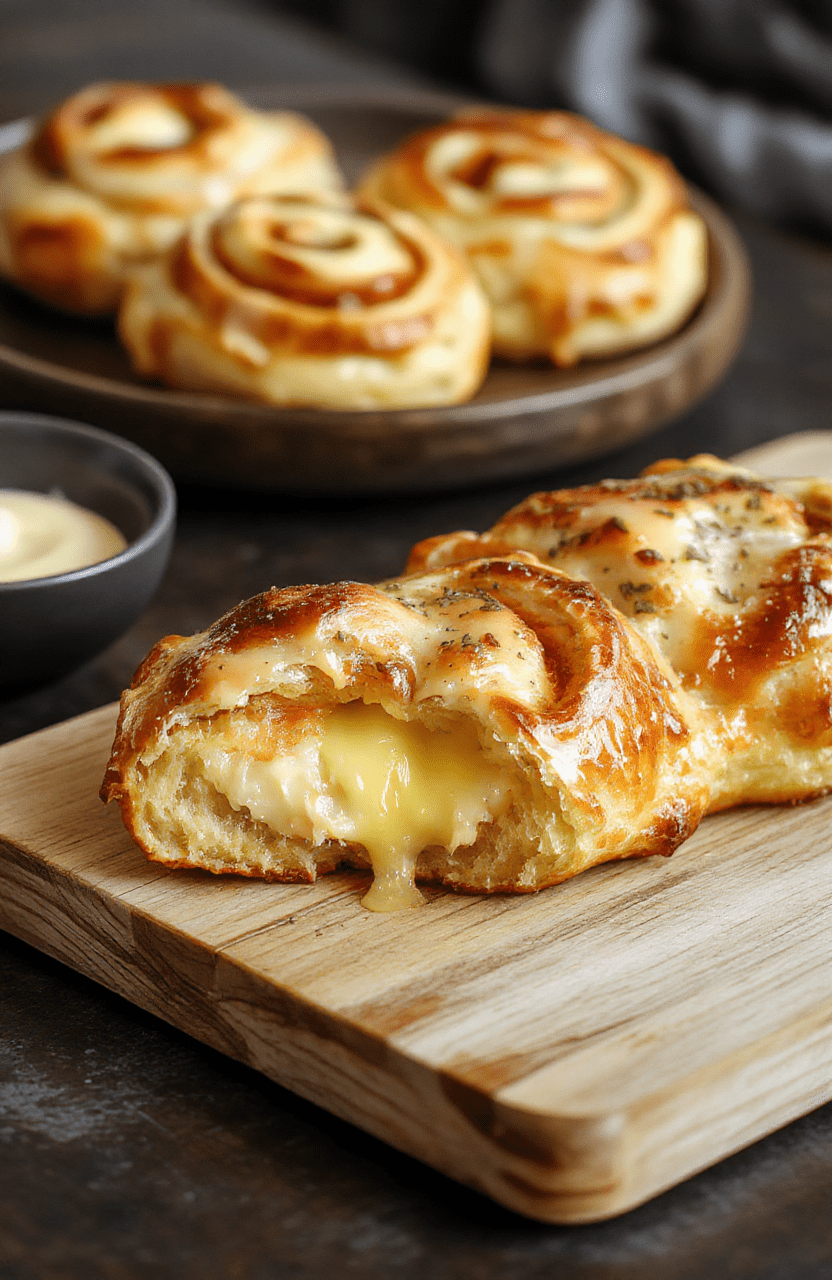
5. How to Make Easy Flaky Cheese Danish Pastry
Phase 1 — Prep and Chill
Preheat your oven to 400°F (200°C) and line a baking sheet with parchment. If using thawed puff pastry, roll it to an even 1/8-inch thickness and square off the edges for neat, bakery-style squares. Chill the dough briefly to keep those sharp, flaky layers intact as it bakes. You should smell sweet butter and faint vanilla as the dough rests.
Phase 2 — Cheese Filling
Beat 8 ounces of cream cheese with 2–3 tablespoons of sour cream or yogurt until smooth. Stir in 1/2 cup shredded sharp cheddar or Gruyère and a pinch of sugar. Add a little lemon zest if you love a bright note. The filling should be tangy, creamy, and ready to spoon into the pastry pockets.
Phase 3 — Assemble
Cut the puff pastry into squares and place a spoonful of filling in the center of each square. Fold the corners to form a classic Danish shape or leave them square for rustic appeal. Brush with a light egg wash to encourage a glossy, golden finish. If you can resist, chill the assembled pastries for 10 minutes before baking to help set the layers.
Phase 4 — Bake and Finish
Bake until the edges are deeply golden and the cheese center is just set, about 18–22 minutes. The pastries should crackle with layered flakiness, and the cheese should be melted and slightly browned at the edges. A final whisper of cinnamon sugar on top adds a bakery-like aroma as they come out of the oven. Let them rest briefly on a rack before serving warm.
6. Expert Tips for Success
Keep everything cold until the moment it goes into the oven to preserve the flaky layers. If you’re working with store-bought puff pastry, avoid overworking it, which can dull the delicate lamination. Bake on a middle rack for even heat and flip between trays if you’re baking multiple sheets. For a punchier cheese bite, try a sharper cheese variety or finish with a pinch of flaky sea salt right after baking. If you’re new to pastry, practice with a single sheet first to dial in your oven’s quirks.
7. Variations & Substitutions
Gluten-free option: use a gluten-free puff pastry dough, keeping the filling the same for a close-to-original texture. Dairy-free option: use a dairy-free cream cheese and a vegan cheese blend that melts well; you may need to adjust moisture with a splash of dairy-free yogurt. Savory twists: fold in sautéed mushrooms or caramelized onions for a brunch-ready bite. Sweet-savory: add a whisper of jam or honey drizzle after baking for a modern twist.
8. Storage & Reheating
Store cooled pastries in an airtight container at room temperature for up to 2 days. For longer storage, freeze unbaked pastries arranged on a sheet, then transfer to a bag once frozen; bake directly from frozen, adding a few extra minutes. Reheat in a warm oven (350°F/175°C) for 6–8 minutes to restore flakiness and meltiness.
9. FAQ
Q: What is the best cheese for a cheese danish?
A: A melty blend of cream cheese with a sharper cheese like cheddar or Gruyère provides a balanced tang and good melt. If you prefer a milder finish, use all cream cheese but add a pinch of salt and a teaspoon of sour cream for moisture.
Q: Can I freeze this pastry before baking?
A: Yes. Assemble the pastries, place on a sheet to chill, then freeze individually. Transfer to a bag; bake from frozen, adding a few extra minutes until golden and bubbly.
Q: Can I make this in advance?
A: Partially yes. You can prepare the cheese filling and the dough, chill, then assemble and bake the next day for a fresh, flaky result.
Q: How do I avoid soggy bottoms?
A: Keep the dough cold and bake on parchment-lined sheets in a hot oven. If needed, pre-bake the crust for 4–5 minutes before adding the filling to improve structure.
10. Conclusion
This Easy Flaky Cheese Danish Pastry brings bakery-bright flavors to your kitchen with minimal fuss. The combination of buttery, flaky layers and a creamy cheese center makes every bite irresistible. Save time with convenient puff pastry, and feel free to customize the cheese and herbs to suit your taste. Enjoy this cheese danish recipe as a standout breakfast treat or a show-stopping pastry for brunch guests.
Print
Easy Flaky Cheese Danish Pastry
A bakery-style breakfast pastry featuring flaky puff pastry filled with a creamy cream cheese filling, baked until golden and glossy. Perfect for weekend brunch or a quick weekday treat.
- Total Time: 27-30 mins
- Yield: 6 pastries 1x
Ingredients
- 1 sheet puff pastry, thawed
- 8 oz cream cheese, softened
- 1/4 cup granulated sugar
- 1 tsp vanilla extract
- 1/8 tsp salt
- 1 egg, beaten (for glaze)
Instructions
- Preheat oven to 400F (200C) and line a baking sheet with parchment.
- Roll out puff pastry on a lightly floured surface and cut into 6 rectangles.
- Beat together cream cheese, sugar, vanilla, and salt until smooth. Spoon filling onto the center of each rectangle.
- Fold the pastry over the filling to enclose it, pinch edges to seal. Brush with beaten egg.
- Bake 12-15 minutes until golden and puffed. Let cool slightly before serving; dust with powdered sugar if desired.
Notes
- For a lighter pastry, chill the filling before filling the dough.
- Keep puff pastry cold until ready to bake to maximize flaky layers.
- Leftovers store in the fridge for up to 2 days and rewarm in a 350F oven for 5-7 minutes.
- Prep Time: 15 mins
- Cook Time: 12-15 mins
- Method: Baking
- Cuisine: American
- Diet: Vegetarian
Nutrition
- Serving Size: 1 pastry
- Calories: 260 Kcal
- Sugar: 9 g
- Sodium: 180 mg
- Fat: 18 g
- Saturated Fat: 9 g
- Unsaturated Fat: 9 g
- Trans Fat: 0 g
- Carbohydrates: 20 g
- Fiber: 1 g
- Protein: 6 g
- Cholesterol: 60 mg
