🍔 Zesty Cheeseburger Bombs: Quick 20 Minute Dinner ⏱️
1. Introduction
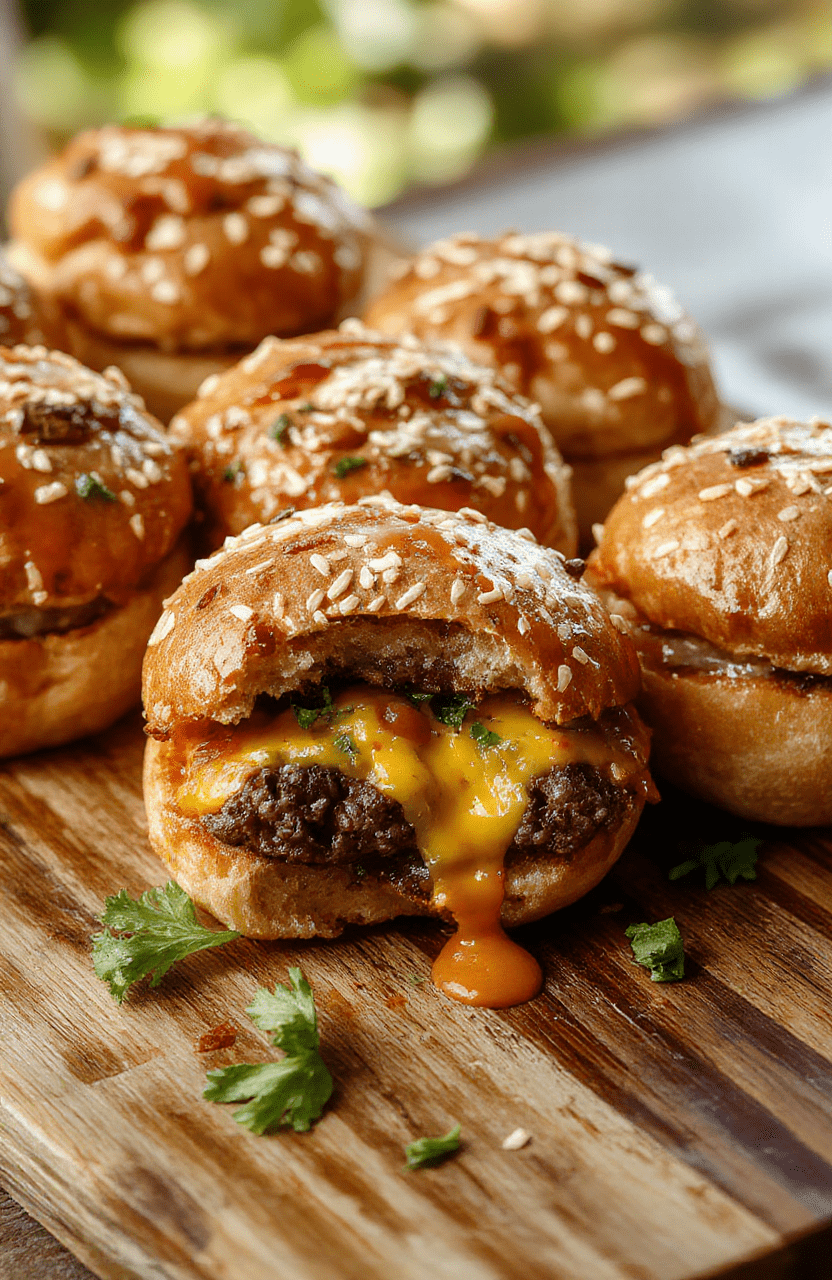
Zesty Cheeseburger Bombs are everything you crave in a weeknight bite: juicy, saucy, and bursting with melted cheese. This dish hits all the flavor notes you love—savory beef, tangy pickles, and a punch of zesty seasoning—without keeping you at the stove for hours. It’s the perfect 20 minute dinner that tastes like a full-on burger night, but with less mess and more wow. Ready in minutes, it keeps your evening moving while delivering a comforting, familiar bite.
As you bite into these mini bombs, you’ll notice the crisp edges, the molten cheese core, and the bright zing from the pickles and mustard. The aroma is irresistible: browned beef, onion caramelizing slightly, and a hint of garlic drifting through the air. If you’re after a quick weeknight dinner that still feels special, this quick and satisfying recipe will become a recurring favorite.
2. Why You’ll Love This Recipe
- Ready in 30 minutes or less with a focus on a true 20 minute dinner timeline.
- One-pan or skillet method for easy cleanup and maximum flavor.
- Cheesy, punchy flavor that mimics a classic cheeseburger in a handheld, bite-sized form.
- Versatile for mixers and toppings—swap in pimentos, jalapeños, or your favorite pickles for a personal touch.
3. Ingredient Notes
For the beef, aim for a flavorful mix—about 80/20 ground beef provides the right fat content for juiciness and browning. A touch of onion, garlic, and a splash of Worcestershire makes the patties sing without overpowering the cheese core. If you prefer a lighter option, you can substitute ground turkey, but you may need a little extra binder to keep the bombs cohesive.
The cheese should be substantial enough to melt into a gooey center. Cubes or thick shreds of cheddar or American-style cheese work beautifully. Dill pickles add bright acidity, while a dab of mustard or relish slides in that classic cheeseburger tang. For depth, a pinch of smoked paprika or garlic powder is a simple upgrade. If you’re serving these with buns, brioche or potato buns add a luxurious touch that echoes a traditional burger.
Want to explore more comforting, quick meals? Check out Creamy Dijon Chicken with Vegetables for another crowd-pleasing weeknight option, or explore other fast favorites like Juicy Garlic Butter Steak and Potatoes (One-Pan Dinner).
4. Kitchen Tools You Need
To nail the texture and speed of these bombs, a few dependable tools make all the difference. A sturdy skillet helps achieve that crisp edge and even browning. For a hands-off finish, a reliable air fryer can yield a perfectly crispy exterior in less time and with less oil. If you love a comprehensive gear setup, consider a nonstick cookware set that handles searing and oven finishing with ease.
Helpful external gear to consider:
- Compact 6-in-1 Digital Air Fryer by Amazon Basics – ideal for a quick bake finish that keeps tops molten and bottoms crisp.
- T-fal 14-Piece Hard Anodized Nonstick Cookware Set – durable, easy-release pans that stand up to searing and shallow baking.
- Ninja Foodi Smart XL Indoor Grill & Air Fryer Combo – for a smoky, grill-style finish without firing up the backyard.
Having the right tools streamlines the process and keeps your results consistent. If you’re new to chocolate-brown searing, a good skillet and a reliable thermometer help you judge the exact moment the bombs are perfectly browned and juicy inside. For more gadget recommendations, you can browse other kitchen picks like the KitchenAid Artisan 5-Quart Stand Mixer—a versatile workhorse that makes prep easier for other recipes in your rotation.
5. How to Make Zesty Cheeseburger Bombs Quick 20 Minute Dinner
Phase 1: Prep the filling
In a medium bowl, combine ground beef with a pinch of salt, pepper, onion powder, garlic powder, and a splash of Worcestershire. Mix just until combined; overworking the meat can make the bombs tough. Chill the mixture briefly to help with shaping and to lock in moisture.
Phase 2: Shape and seal
Pinch off small portions and flatten into discs. Place a cube or ribbon of cheese and a pickle spear or shard in the center, then wrap the meat around the filling to seal completely. The goal is a seam-free edge so the cheese stays tucked inside as it bakes or air-fries. Place on a parchment-lined sheet pan for easy cleanup.
In a hot skillet with a light coating of oil, sear the bombs until the edges are deeply browned and the undersides crust. You want a color like caramelized bronze, not gray. This quick sear adds flavor and helps set the shape before finishing through baking or air frying.
Phase 3: Finish and serve
Finish the bombs in the oven at 400°F (204°C) for 6–10 minutes, or in the air fryer at 375°F (190°C) for 8–10 minutes, until the cheese is molten and the beef reaches your preferred doneness. Let them rest for a couple of minutes before serving. A light drizzle of mustard or a dollop of ketchup on the side mirrors the classic burger experience.
Serve with cracked pepper buns, a crisp side of fries, or a simple green salad. The balance of juicy beef, melted cheese, and tangy pickle comes through in every bite, delivering a satisfying 20 minute dinner that feels indulgent without sticking you in the kitchen all night.
6. Expert Tips for Success
- Keep the filling chilled before shaping to prevent the cheese from leaking out during cooking.
- Use a light touch when mixing the beef. Mix until just combined to maintain tenderness.
- Seal seams completely to prevent cheese from oozing out as they cook.
- Balance salt with a tiny pinch of sugar or a splash of Worcestershire to brighten flavors without dulling the meat.
- For extra crispness, finish in a hot oven or air fryer for a minute or two after browning the bottoms in the pan.
7. Variations & Substitutions
- Use ground turkey or chicken, but add an extra tablespoon of breadcrumbs and a splash of beef bouillon for depth.
- Skip cheese inside and use a cheese-stuffed center for a dramatic molten core, then finish with a sprinkle of grated cheese on top during the last minute of cooking.
- Make it gluten-free by using gluten-free breadcrumbs or crushed pork rinds as a binding agent.
- Try different toppings: sweet relish, spicy pickles, or a drizzle of barbecue sauce for a smoky twist.
8. Storage & Reheating
Store leftover bombs in an airtight container in the fridge for up to 2 days. Reheat in a 350°F (175°C) oven or air fryer for best texture—about 5–7 minutes in the air fryer or 8–10 minutes in the oven, until heated through and cheese is melty again.
Freeze the shaped patties unbaked for up to 1 month; thaw fully before cooking. This makes busy weeknights even faster, as you can pull them from the freezer, let them come to a chill, and cook as directed.
9. FAQ
- Q: Are these spicy? A: They can be mild or with a gentle kick depending on the seasonings you use. If you like heat, add a pinch of cayenne or a few chopped jalapeños to the beef mix.
- Q: Can I make them ahead? A: Yes. Shape the bombs and refrigerate for up to 24 hours before cooking. You can also freeze shaped but unbaked bombs and bake from frozen, just add a few extra minutes.
- Q: What should I serve with them? A: Classic accompaniments like fries, a crisp salad, or coleslaw pair perfectly. A soft brioche bun can turn them into a true burger experience.
- Q: How can I ensure a gooey cheese center? A: Use firm cheese chunks or thick slices and fully seal the seams. A brief finish under high heat helps melt the interior without drying the outside.
10. Conclusion
Zesty Cheeseburger Bombs deliver a bold, comforting bite in under 20 minutes, making them an ideal quick weeknight dinner option. With simple ingredients, smart technique, and a few well-chosen kitchen tools, this recipe becomes a staple for busy families and flavor seekers alike. Save this idea for busy nights, and you’ll always have a satisfying, family-friendly dinner at the ready.
Print
Zesty Cheeseburger Bombs Quick 20 Minute Dinner
Juicy, cheese-stuffed beef bombs baked to golden perfection, served in slider buns for a fun, crowd-pleasing dinner.
- Total Time: 30 mins
- Yield: 6 bombs 1x
Ingredients
- 1 lb ground beef, 85% lean
- 1/2 cup shredded cheddar cheese
- 1/4 cup finely chopped onion
- 2 cloves garlic, minced
- 1/4 cup breadcrumbs
- 1 large egg
- 1 tablespoon ketchup
- 1 teaspoon yellow mustard
- 1 teaspoon Worcestershire sauce
- 1/2 teaspoon salt
- 1/4 teaspoon black pepper
- 8–10 slider buns
- Optional: dill pickles for serving
Instructions
- Preheat oven to 400°F (200°C). Line a sheet pan with parchment.
- In a bowl, combine beef, cheddar, onion, garlic, breadcrumbs, egg, ketchup, mustard, Worcestershire, salt, and pepper until just mixed.
- Shape into 6-8 bombs, sealing cheese inside.
- Place bombs on the sheet pan and bake 12–15 minutes until browned and cheese is melted.
- Toast buns if desired, then sandwich each bomb into a bun and serve with toppings.
Notes
- Avoid overworking the meat to keep the bombs tender.
- For faster assembly, portion and chill bombs briefly before baking.
- Switch cheddar for pepper jack for extra heat.
- Make ahead: form bombs and refrigerate up to 2 hours before baking.
- Prep Time: 15 mins
- Cook Time: 15 mins
- Method: Baking
- Cuisine: American
- Diet: Non-Vegetarian
Nutrition
- Serving Size: 1 bomb (approx)
- Calories: 320 Kcal
- Sugar: 4 g
- Sodium: 520 mg
- Fat: 20 g
- Saturated Fat: 9 g
- Unsaturated Fat: 11 g
- Trans Fat: 0 g
- Carbohydrates: 9 g
- Fiber: 1 g
- Protein: 22 g
- Cholesterol: 90 mg
