
🍪 No Bake Cookie Dough Bites: Irresistible No Bake Cookie Dough Truffles for Dessert Lovers 🍫
1. Introduction – no bake cookie dough bites
Imagine a bite-sized treat that tastes like your favorite cookie dough, yet requires no oven. The creamy centers melt on your tongue with a hint of vanilla, while a glossy chocolate shell adds a satisfying snap. These no bake cookie dough bites are built for texture, aroma, and pure snack-ability, and they’re ready in minutes. No fancy equipment needed—just a trusty bowl, a spoon, and a little patience as they firm up in the fridge. If you’re craving a playful after-dinner bite, this recipe hits the spot and pairs beautifully with other treats like our easier no-bake desserts. For a different creamy snack, you might enjoy our creamy peanut butter oat cups no bake treat, linked here: Creamy Peanut Butter Oat Cups.
The idea behind no bake cookie dough bites is to capture the comforting vibes of cookie dough—without eggs or raw batter. The texture is smooth and almost velvety, with a whisper of brown sugar that echoes a familiar cookie profile. A dip in melted chocolate adds a glossy finish and a little crunch from the cocoa nibs or chips you choose. These bites are a smart, crowd-pleasing option for potlucks, school lunches, or a cozy movie night at home.
2. Why You’ll Love This Recipe
- Ready in 30 minutes from start to finish, perfect for a last-minute treat.
- One-bowl prep keeps cleanup quick and easy.
- No eggs or heat required, making it a safer, kid-friendly project.
- Customizable flavors—swap in peanut butter, almond butter, or dark chocolate for different vibes.
- Try pairing with a quick dessert platter by linking to other simple comforts like Healthy Chocolate Protein Muffins or our Creamy Tomato Garlic Pasta for a full menu.
3. Ingredient Notes
The base relies on pantry-friendly components that deliver a rich, cookie-dough feel without an oven. Use unsalted butter for depth and control over salt. A touch of brown sugar provides caramelized notes that echo classic cookies, while powdered sugar keeps the dough smooth and scoopable. To keep things safe and accessible, I prefer heat-treated flour or oat flour in the centers so you can enjoy every bite without worry.
For the coating, choose high-quality dark or milk chocolate chips and a pinch of flaky sea salt to finish. If you’re dairy-free, use a good quality dairy-free chocolate and a splash of coconut oil for a glossy shell. If you like a nuts-for-crunch texture, stir in finely chopped toasted nuts or cacao nibs. For a lighter version, substitute half of the butter with creamy coconut oil and add a splash of vanilla for depth. Internal links for related no-bake inspiration: quick weeknight dinners and crispy veggie snacks can help round out your snack menu.
Quality ingredients do the heavy lifting here. If you’re using peanut butter, choose natural peanut butter with just peanuts and salt for a clean, creamy center. For the best texture, chill the dough briefly before rolling, which helps the bites hold their shape when you dip them in chocolate.
4. Kitchen Tools You Need
Stock up on a few reliable tools to make this recipe effortless. A sturdy stand mixer helps smooth butter and sugar into a luscious base, especially if you’re scaling up. If you don’t have one, a good hand mixer works just as well. For easy shaping, a round cookie scoop or measuring spoon makes uniform bites. Parchment paper lined sheet trays keep the finished truffles from sticking and speed up chilling time.
Pro tip: a Compact 6-in-1 Digital Air Fryer isn’t required here, but it’s a handy gadget for future batches when you want a glossy shell without overheating. If you’re in the market for a more complete upgrade, consider a versatile T-fal 14-Piece Nonstick Cookware Set to keep your kitchen performing at its best. For a premium setup that can tackle chocolate work with precision, the Ninja Foodi Smart XL Indoor Grill & Air Fryer Combo is a fantastic option. If you prefer espresso to sip while you bake, a compact coffee setup like the Breville Nespresso Vertuo Creatista can complete your cozy dessert scene.
Budget-friendly staple choices include a KitchenAid Artisan Stand Mixer and a reliable Ninja SLUSHi Pro for quick chocolate melts. For storage, a set like the JoyJolt Airtight Glass Storage Set keeps any leftovers fresh.
5. How to Make No Bake Cookie Dough Bites
Phase 1 — Make the dough
In a medium bowl, beat the butter and sugars until the mixture looks pale and fluffy. The scent should be warm and buttery with a hint of vanilla. Stir in the heat-treated flour or oat flour, a pinch of salt, and any flavor boosters like vanilla or almond extract. The dough should be soft yet scoopable, not greasy.
Phase 2 — Chill the dough
Gently stir in mini chocolate chips or chopped chocolate. Chill the dough for about 15 minutes so it’s easy to roll into neat spheres. You’ll notice the mixture becomes firmer and easier to handle as it rests.
Phase 3 — Shape and coat
Roll the dough into bite-sized balls, about 1 inch in diameter. Place them on a parchment-lined tray and refrigerate while you melt the chocolate. Dip each sphere into melted chocolate, letting the excess drip off, and return to the tray. A light shower of flaky sea salt at this stage adds a gorgeous finish.
Phase 4 — Chill to set
Chill the coated bites for 20–30 minutes until the chocolate is firm. The shells will glossy and snap when you bite into them. If you want to speed things up, you can place the tray in the freezer for about 10 minutes.
Tip: If the dough becomes too crumbly, add a teaspoon of milk or cream to bring it back to scoopable consistency. For extra flavor, drizzle a contrasting chocolate over half the batch once the shells are set.
6. Expert Tips for Success
- Use heat-treated flour to keep things safe and edible without eggs. If you can’t find it, substitute with oat flour for a similar texture.
- Keep everything cold. The dough rolls better when it’s chilled, and the chocolate shells set faster on a cool surface.
- Don’t skip chilling between steps; it helps maintain shape and prevents the centers from becoming oily.
- Choose high-quality chocolate for a glossy finish and satisfying snap. Tempering isn’t required, but a quick melt and rest yields a smoother coat.
- For a nutty twist, fold in finely chopped toasted hazelnuts or almonds before chilling.
- Make a batch of varying flavors by adding a teaspoon of peanut butter or cookie butter to half the dough.
- If you’re dairy-free, swap to dairy-free chocolate and a dairy-free butter substitute; you’ll still get a luscious bite.
- Want a bite-sized “cookie” vibe? Roll the centers in sprinkles or crushed cookies before chilling.
7. Variations & Substitutions
Experiment with textures and flavors to suit dietary needs or mood. For a gluten-free version, use gluten-free heat-treated flour or oat flour. If you’re avoiding dairy, opt for dairy-free chocolate and use coconut oil in the coating. For a more intense chocolate profile, mix in a teaspoon of cocoa powder to the dough before chilling. You can also swap the chocolate coating for a white chocolate shell, or coat with finely chopped nuts for extra crunch. For a fun twist, crumble a few pieces of crushed cookie or shortbread into the dough to echo classic cookies without baking.
8. Storage & Reheating
Store the truffles in an airtight container in the refrigerator for up to 1 week. They can also be frozen for up to 2–3 months; freeze on a parchment-lined tray first, then transfer to a bag or container. Bring to room temperature for 5–10 minutes before serving to soften the center slightly and enhance the cookie-dough aroma.
9. FAQ
Q: Are no bake cookie dough bites safe to eat? A: Yes, when you use heat-treated flour or oat flour and omit raw eggs, these bites are safe and delicious.
Q: Do no bake cookie dough bites need to be refrigerated? A: For best texture and freshness, refrigerate them. They stay firmer and maintain the chocolate coating longer.
Q: Can I freeze these bites? A: Absolutely. Freeze on a tray, then transfer to an airtight container. They keep well for 2–3 months.
Q: What other coatings work well? A: White chocolate, dark chocolate with a pinch of chili, or a crushed candy coating all pair nicely with the dough centers.
10. Conclusion
There you have it—a crowd-pleasing, no-bake treat that captures the cozy, comforting vibe of fresh-from-the-oven cookies. The no bake cookie dough bites come together in minutes, and the chocolate coating adds a glossy finish and satisfyingly crisp bite. Whether you’re serving a party platter or a quick after-school snack, these truffles deliver flavor and texture in every bite. If you’re craving more quick, delicious ideas, explore the linked internal posts for complementary treats and dinner ideas.
Print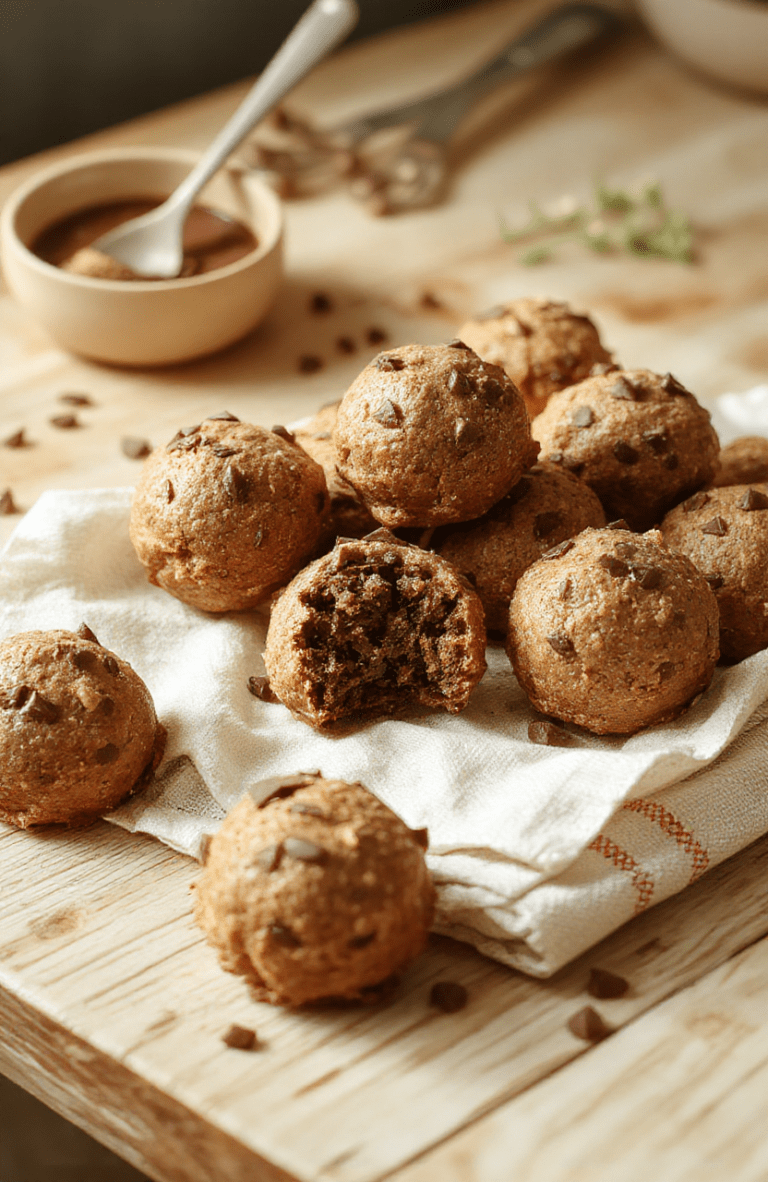
No Bake Cookie Dough Truffles
Creamy peanut butter cookie dough truffles dipped in smooth chocolate, a no-bake treat that’s perfect for quick desserts or party snacks.
- Total Time: 1 hr 15 mins
- Yield: 24–28 truffles 1x
Ingredients
- 1/2 cup (115 g) unsalted butter, softened
- 1 cup creamy peanut butter
- 2 cups powdered sugar
- 1/2 cup all-purpose flour (heat-treated)
- 1 teaspoon vanilla extract
- 1/4 teaspoon salt
- 1/2 cup mini chocolate chips
- 8 ounces (226 g) milk chocolate or semisweet chocolate for coating
Instructions
- In a bowl, beat butter and peanut butter until smooth.
- Stir in powdered sugar, flour, vanilla, and salt until a dough forms.
- Fold in mini chocolate chips; refrigerate 15-20 minutes to firm slightly.
- Scoop and roll into 1-inch balls; refrigerate 30 minutes to harden.
- Mondry melt chocolate, dip truffles, and place on parchment until coating sets.
Notes
- Use heat-treated flour to ensure the dough is safe to eat raw.
- Chill the dough briefly for easier shaping.
- Substitute almond or cashew butter for a different flavor.
- Store leftovers in the refrigerator up to 1 week or freeze for longer storage.
- Prep Time: 15 mins
- Cook Time: 0 mins
- Method: No Bake
- Cuisine: American
- Diet: Vegetarian
Nutrition
- Serving Size: 1 truffle (20 g)
- Calories: 85 Kcal
- Sugar: 8 g
- Sodium: 15 mg
- Fat: 5 g
- Saturated Fat: 3 g
- Unsaturated Fat: 2 g
- Trans Fat: 0 g
- Carbohydrates: 10 g
- Fiber: 0 g
- Protein: 1 g
- Cholesterol: 15 mg
