🍛 Crispy Chicken Katsu Curry Beats Takeout 🍗
1. Introduction — Crispy chicken katsu curry
When the craving for Japanese comfort food hits, Crispy chicken katsu curry delivers a plate that sings with texture and balance. The crack of a panko crust, the juiciness of a perfectly cooked cutlet, and a glossy, mildly spiced curry blanket all come together over fluffy rice. This weeknight favorite tastes like you spent hours in the kitchen, but it comes together in under 40 minutes with smart prep. If you love weeknight Japanese curry, you’re in for a treat that beats takeout on flavor and aroma.
As you slice the crunchy crust, you’ll notice how the inside stays tender and juicy—the hallmark of a well-katsu. The curry, rich with onions, garlic, and ginger, builds depth with a simple roux that smooths into a silky sauce. For more quick inspiration, you might enjoy our other speedy treats like 15-minute big mac wraps or explore a creamy pasta option such as creamy tomato garlic pasta in 30 minutes. If you’re after more snack-worthy bites, take a look at crispy salt-and-vinegar zucchini chips for a light crunch alongside this curry.
2. Why You’ll Love This Recipe
- Ready in 30–40 minutes for a reliable weeknight dinner.
- One-pan curry base pairs beautifully with a crisp chicken cutlet.
- Versatile easily shifts between dairy-free and gluten-free with small swaps.
- Deep, comforting flavors that feel indulgent without requiring takeout labor.
3. Ingredient Notes
- Chicken: Use boneless, skinless chicken breasts for quick cooking, or swap in thighs for extra juiciness. If you pound the breasts to even thickness, they cook uniformly and stay tender inside the crust.
- Panko breadcrumbs: The key to a light, airy crust that stays crisp. Look for Japanese-style panko for maximum crunch.
- Flour, eggs, and seasoning: A classic dredge setup—season the flour and the eggs well so the crust adheres and flavors the crust from the first bite.
- Oil choice: Neutral oil with a high smoke point (vegetable or canola) keeps the crust crisp without imparting extra flavor. If you prefer a lighter approach, you can air fry the cutlets for a less oily finish.
- Japanese curry base: Store-bought curry roux blocks (e.g., mild to medium) streamline the sauce. If you want a more rounded homemade flavor, simmer onions, garlic, ginger, and carrots with a splash of soy, then whisk in a quick roux with flour and stock.
- Vegetables: Classic curry vegetables include onions, carrots, and potatoes. They soften into a velvety sauce; par-cairing potatoes helps them stay tender rather than falling apart.
- Sweetness and salt: A touch of sugar or mirin balances the curry’s savoriness. Adjust salt at the end—sauce should cling to the spoon with a glossy sheen.
4. Kitchen Tools You Need
Having the right tools makes the Crispy Chicken Katsu Curry come together smoothly. The following picks from our tested favorites help you nail texture, timing, and flavor with less guesswork. Each tool links to trusted gear you might already own or would love to add to your cabinet.
- Compact 6-in-1 Digital Air Fryer by Amazon Basics — Perfect for a lighter, crisp finish on chicken without deep frying. It keeps excess fat down while preserving crunch.
- T-fal 14-Piece Hard Anodized Nonstick Cookware Set — A reliable, durable pan for shallow-frying scraps or finishing the curry sauce without sticking.
- Ninja Foodi Smart XL Indoor Grill & Air Fryer Combo — If you love multi-tasking, this saves space and time while producing a crisp crust.
- KitchenAid Artisan 5-Quart Stand Mixer in Scorched Orange — For easily mixing sauces or even preparing a batch of rice with perfect fluff.
- Fullstar Ultimate Veggie Prep Master — A handy helper to dice onions, potatoes, and carrots quickly and evenly.
- Ninja 12-in-1 Smart Double Oven with FlexDoor & Air Fry — Great for when you’re cooking sides and need extra oven space.
5. How to Make Crispy Chicken Katsu Curry
1. Prep and gather
Flatten the chicken to a uniform thickness and season lightly. Set up a dredging station with flour, beaten eggs, and panko. Have your curry ingredients chopped and ready: onions sliced, carrots and potatoes cubed, garlic and ginger minced.
2. Dredge and crisp the chicken
Dust the chicken in seasoned flour, dip in egg, then press into a generous bed of panko. For a traditional crust, press firmly so the crumbs cling. If you’re using the air fryer, lightly spray the crust with oil for extra crunch.
3. Cook the curry sauce
In a pan, soften onions until they become translucent and sweet. Add garlic and ginger, then stir in carrots and potatoes. Pour in stock and crumble in your curry roux blocks (or whisk a homemade roux). Simmer until the vegetables are tender and the sauce thickens to a glossy finish. A splash of soy and a touch of mirin or sugar deepen the flavor and balance the spice.
4. Fry or finish the chicken
Traditionally, the crust is fried until deep golden and crisp. If you’re frying on the stove, heat oil to 350°F and cook about 2–3 minutes per side, watching for a crisp, even crust. If you’re air-frying, bake at 400°F for 8–10 minutes, flipping halfway for even color. Let the crust set for a minute before slicing so the meat stays juicy.
5. Plate and serve
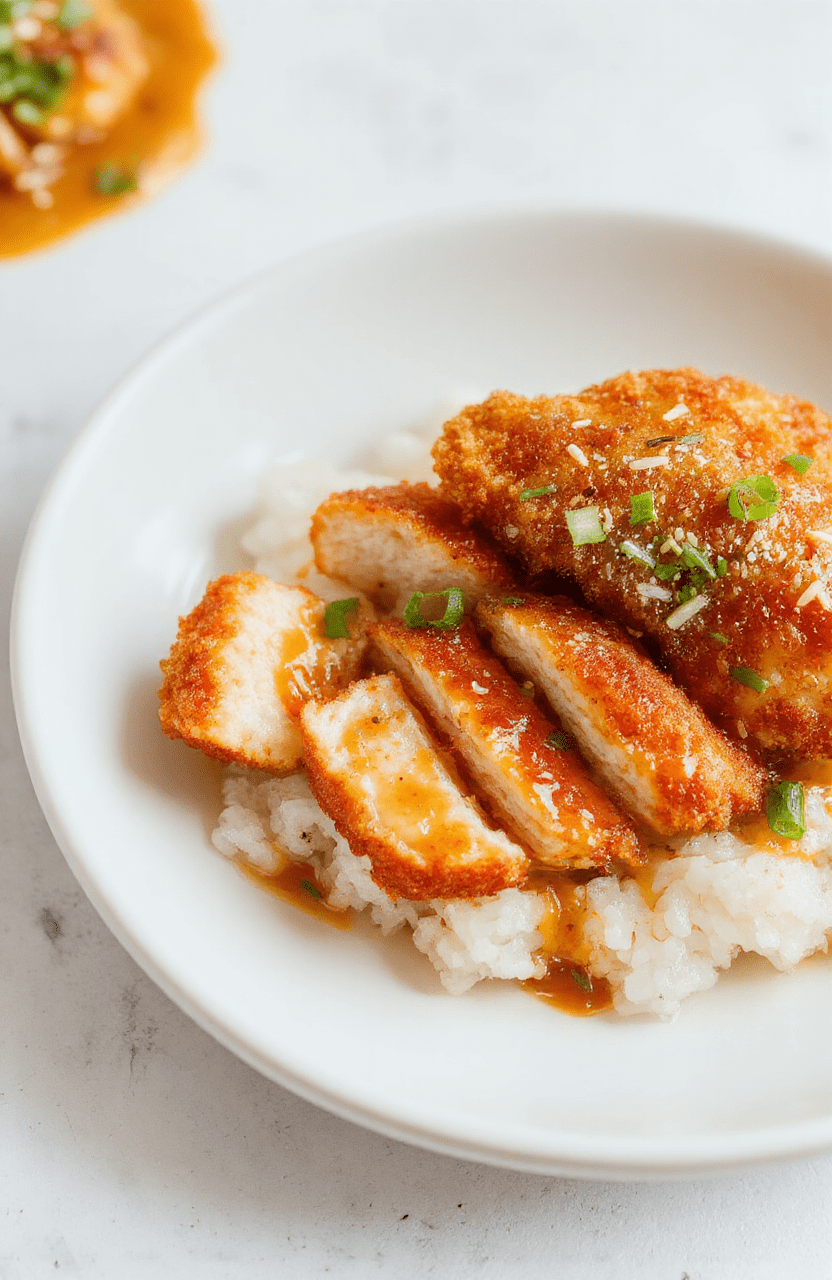
Slice the katsu into strips and lay over a bed of steamed rice. Spoon the curry generously around and over the chicken. The sauce should cling to the rice with a rich sheen, and the crust should crackle under each bite. Garnish with a light dusting of sesame seeds and a sliver of pickled ginger if you like a tangy finish.
6. Expert Tips for Success
- Keep the oil at a steady 340–350°F when frying; a thermometer helps you avoid undercooked centers or overly dark crusts.
- Don’t crowd the pan; work in batches to maintain oil temperature and crisp crusts.
- Dry the chicken well after pounding and before dredging—moisture is the crust’s enemy.
- Make the curry ahead for deeper flavor; a short rest lets the spices mellow and the roux thicken beautifully.
- Use a light drizzle of oil in the pan when softening aromatics to keep them from scorching quickly.
7. Variations & Substitutions
: Try pork cutlets or firm tofu fried in panko for a vegetarian version. For extra protein, add a fried egg on top. : Increase curry roux spiciness or add a pinch of cayenne to raise heat without overwhelming the curry’s sweetness. : Serve with short-grain Japanese rice for authentic texture or with brown rice for a heartier meal.
8. Storage & Reheating
Store leftovers in an airtight container for up to 3 days in the fridge. Reheat the curry gently on the stove until simmering, then crisp the chicken briefly in a hot oven or air fryer to recapture some crispness. If you know you’ll have leftovers, keep the crust separate from the curry and reassemble when ready to eat for best texture.
9. FAQ
Q: What is chicken katsu curry?
A: Chicken katsu curry is a Japanese dish featuring a crispy breaded chicken cutlet served with a rich curry sauce over rice. The crust is usually panko, and the curry is typically a mild, savory-sweet sauce that coats the dish beautifully.
Q: Can I make this dairy-free or gluten-free?
A: Yes. Use dairy-free oil instead of butter, dairy-free curry roux, and gluten-free breadcrumbs or almond flour for dredging. Adjust soy sauce to taste if needed.
Q: Is air frying as good as deep-frying for katsu?
A: Air frying yields a crisp crust with far less oil and similar texture. You may need a brief extra minute or two in the air fryer depending on thickness.
Q: How do I know the chicken is cooked through?
A: Use a meat thermometer; chicken should reach 165°F (74°C) in the thickest part. Let it rest for a couple of minutes before slicing to keep juices inside.
10. Conclusion
With a crisp crust, a velvety curry, and rice that soaks up every delicious drop, Crispy Chicken Katsu Curry wins weeknights without feeling like a compromise. It’s a dish you can customize for spice, texture, and dietary needs while keeping the soul of traditional Japanese curry intact. Enjoy a plate that tastes like a night market stroll—without leaving your kitchen.
Print
Crispy Chicken Katsu Curry Beats Takeout
Crispy chicken cutlets fried to a golden crust, served with fluffy steamed rice and a rich Japanese curry sauce studded with carrot and potato.
- Total Time: 40 mins
- Yield: 4 servings 1x
Ingredients
- 4 boneless skinless chicken cutlets (about 1.25 lb)
- Salt and pepper
- 1/2 cup all-purpose flour
- 2 eggs, beaten
- 1 cup panko breadcrumbs
- 1/4 cup neutral oil, for frying
- 2 cups cooked white rice
- 1 tablespoon vegetable oil
- 1 small onion, thinly sliced
- 1 carrot, diced
- 1 potato, peeled and cubed
- 2 cups chicken stock
- 1 tablespoon curry powder (or 1 Japanese curry roux block)
- 1 tablespoon soy sauce
- 1 teaspoon honey or sugar
- Optional garnish: sesame seeds, chopped scallions
Instructions
- Season chicken cutlets with salt and pepper. Dredge in flour, dip in eggs, and coat with panko.
- Fry in hot oil until golden and cooked through. Drain on paper towels.
- In a separate pan, sauté onion, carrot, and potato until softened.
- Add stock, curry powder or roux, soy sauce, and honey. Simmer until vegetables are tender and sauce thickens.
- Slice the chicken and serve over rice with the curry spooned over top. Garnish with sesame seeds and scallions.
Notes
- For extra crispiness, double-dry and double-fry the chicken.
- Keep the curry warm on low heat; reheat gently to avoid sticking.
- Swap chicken thighs for juicier texture; adjust curry to taste with more or less roux.
- To make gluten-free, use gluten-free panko and flour substitute and gluten-free curry roux.
- Prep Time: 15 mins
- Cook Time: 25 mins
- Method: Deep-Fry, Stovetop
- Cuisine: Japanese
- Diet: Contains gluten
Nutrition
- Serving Size: 1 plate
- Calories: 640 Kcal
- Sugar: 8 g
- Sodium: 1200 mg
- Fat: 26 g
- Saturated Fat: 8 g
- Unsaturated Fat: 14 g
- Trans Fat: 0 g
- Carbohydrates: 72 g
- Fiber: 3 g
- Protein: 32 g
- Cholesterol: 120 mg
