🍯 Sticky Honey Garlic Chicken One Pan Dinner – Sweet, Savory, & Ready in 30 Minutes!
1. Introduction
There’s something undeniably comforting about a sticky honey garlic chicken dinner that sizzles in one pan and requires minimal cleanup afterward. This recipe delivers rich, caramelized flavors—honey glazes the chicken to a glorious amber shine, garlic and soy sauce deepen the umami, and a touch of lime brightens every bite. Perfect for busy weeknights, this one-pan wonder feeds a crowd (or leftovers for lunch!) and pairs beautifully with roasted potatoes, steamed rice, or even over creamy mashed cauliflower. As a home cook who’s tested this recipe more times than I can count, I promise: the aroma alone will have your family racing to the kitchen.
2. Why You’ll Love This Recipe
- ✔ Ready in under 30 minutes—ideal for fast weeknight dinners without sacrificing flavor.
- ✔ One-pan cooking means fewer dishes and consistent heat for perfectly caramelized chicken.
- ✔ Balanced sweet-savory profile: honey, garlic, and a splash of citrus create complex depth.
- ✔ Family-friendly—kids love the mild sweetness, and adults appreciate the bold umami finish.
- ✔ Versatile base: easily swap proteins, add vegetables, or adapt to dietary needs (details in Section 7).
3. Ingredient Notes
Quality makes all the difference here—especially with just a handful of ingredients. Start with boneless, skinless chicken thighs instead of breasts: thighs stay juicy even when glazed heavily and offer richer flavor. For the honey, raw local honey adds floral notes that supermarket brands can’t match—and it pairs beautifully with freshly minced garlic (never jarred!). Fresh garlic burns easily, so I mince it right before adding it to the pan to avoid bitterness. The sauce also includes low-sodium soy sauce (to control saltiness), rice vinegar for brightness, and a pinch of red pepper flakes for subtle heat. Don’t skip the lime zest—it intensifies the aroma without making the dish acidic. For a deeper glaze, I often finish with a swirl of sesame oil and a scattering of toasted sesame seeds.
4. Kitchen Tools You Need
While the recipe works in almost any skillet, having the right tools ensures consistent results and less stress. A heavy-based oven-safe skillet (like cast iron or tri-ply stainless steel) is ideal for searing and finishing under the broiler—but if you’re baking the whole pan, make sure it’s oven-safe! For versatility, consider the T-fal 14-Piece Hard Anodized Nonstick Cookware Set, which includes a perfectly sized 12-inch skillet with a stay-cool handle for seamless stovetop-to-oven transitions. If you love air-fried texture without the oven heat, the Compact 6-in-1 Digital Air Fryer by Amazon Basics can crisp the chicken in minutes and reduce oil use. For serious home chefs, the Ninja Foodi Smart XL Indoor Grill & Air Fryer Combo can mimic wood-fired flavor and crispiness in under 20 minutes—great for busy weeknights. And let’s not forget storage: keep leftovers fresh in JoyJolt Airtight Glass Food Storage Set for up to 4 days.
5. How to Make Sticky Honey Garlic Chicken
Phase 1: Prep & Pare
Begin by patting the chicken thighs dry with paper towels—this is critical for a golden crust. Mix soy sauce, honey, minced garlic, rice vinegar, lime zest, and red pepper flakes in a small bowl. Set aside. Dice one medium russet potato into ½-inch cubes (you’ll roast these in the same pan for a full meal) and mince fresh parsley for garnish.
Phase 2: Sear & Sizzle
Heat 1 tablespoon of avocado oil in an oven-safe 12-inch skillet over medium-high heat. Add potatoes first—they take longer—and season with salt and black pepper. Cook uncovered for 8–10 minutes, stirring occasionally, until golden and tender-crisp. Push potatoes to the edge, add 1 tbsp butter, and let it melt. Increase heat to high, then add chicken thighs skin-side down (if using skin-on) and sear for 5 minutes undisturbed until deeply browned. Flip and cook 2 more minutes.
Phase 3: Glaze & Bake
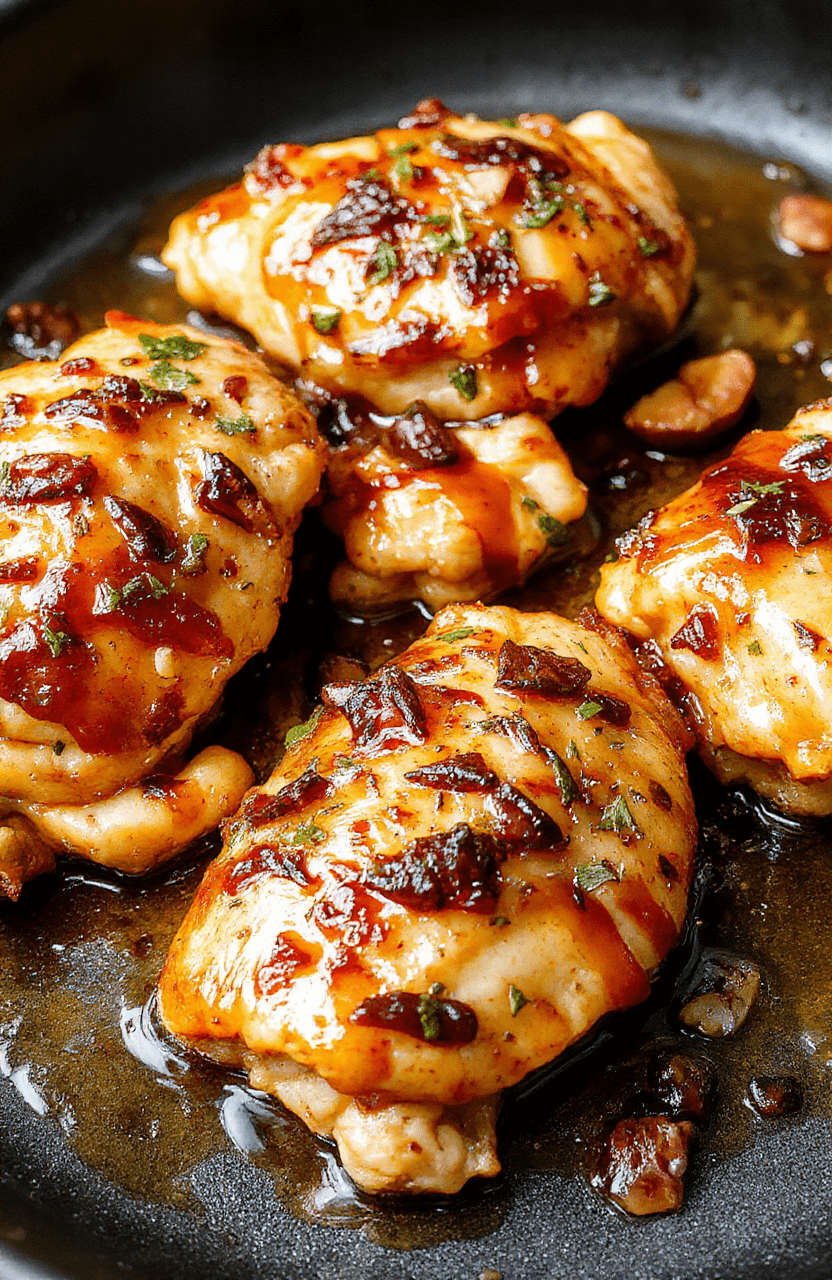
Pour the honey-garlic sauce into the skillet—watch it sizzle and bubble! Stir gently to coat everything. Bring to a simmer, then transfer the entire pan to a preheated oven at 400°F (200°C). Bake 10–12 minutes, or until chicken internal temperature hits 165°F (74°C). For extra caramelization, switch to broil for the final 1–2 minutes—*but keep an eye on it!* The edges will darken beautifully while maintaining a sticky, glossy finish.
Phase 4: Rest & Serve
Remove the skillet from the oven and let rest 5 minutes. This allows the sauce to thicken and cling to the chicken and potatoes. Taste and adjust seasoning if needed—perhaps an extra squeeze of lime juice or a drizzle of honey. Garnish with parsley and sesame seeds, then serve directly from the pan for rustic charm.
6. Expert Tips for Success
Many attempt this recipe but miss the sticky-glossy texture—here’s how to get it right. First, don’t add garlic too early: it burns fast under high heat. Always add the minced garlic *after* the pan cools slightly from searing. Second, let the sauce reduce uncovered for the last 2–3 minutes on the stovetop before baking—it thickens dramatically as it cools. Third, use thighs, not breasts for better moisture retention. Fourth, for extra depth, add 1 teaspoon of ginger paste with the garlic. Finally, if your sauce is too sweet, balance it with a splash of apple cider vinegar or a squeeze of pineapple juice—both cut the sugar while enhancing fruitiness.
7. Variations & Substitutions
This recipe is wonderfully adaptable: • Vegetarian? Swap chicken for extra-firm tofu or portobello mushrooms—marinate for 15 minutes first. • Low-sugar? Use a monk fruit maple syrup blend instead of honey and reduce the amount by 20%. • Spicy lover? Add 1 tsp gochujang or 2 tbsp sriracha to the sauce. • Add veggies? Toss in broccolini, snap peas, or bok choy during the last 5 minutes of baking. • Gluten-free? Use tamari instead of soy sauce. • No oven? Cook covered on low heat for 15–18 minutes until chicken is done, then uncovered for 3 to reduce sauce.
8. Storage & Reheating
Store cooled leftovers in an airtight container in the fridge for up to 4 days. The sauce will solidify in the fridge—just reheat gently. For best texture, rewarm in a skillet over medium-low heat with 1 tbsp water or broth to loosen the glaze. Avoid the microwave alone—it can make chicken rubbery and sauce watery. For a quick boost, crisp rewarmed portions in a Ninja Air Fryer Pro Crisp & Roast 4-in-1 for 2–3 minutes at 375°F. Freeze individual portions for up to 2 months—thaw overnight in the fridge before reheating.
9. FAQ
Why is my honey garlic chicken not sticky enough?
The sauce needs to reduce and caramelize—don’t add cornstarch, which makes it gummy. Instead, simmer the sauce uncovered for 2–3 minutes until it thickens slightly before adding chicken. The sugars in honey concentrate during cooking, so patience is key!
Can I make this ahead of time?
Yes! Make the sauce up to 3 days ahead and store it in the fridge. Sear the chicken and roast the potatoes fresh for best texture. Or fully assemble, cool completely, refrigerate, then bake when needed (add 5–10 minutes to bake time).
What sides pair best?
Our Crispy Garlic Parmesan Potato Wedges or Crispy Oven-Roasted Potatoes double down on cozy carbs. Lighter options include steamed jasmine rice, fluffy quinoa, or our Easy Chicken Sausage Orzo. For a green contrast, serve with a simple kale-sesame salad or steamed bok choy.
Can I use chicken breasts?
You can—but they dry out faster. Pound them to even thickness, reduce cooking time, and use a meat thermometer to avoid overcooking (160°F is safe once resting). Or brine beforehand: 1 cup water + 1 tbsp salt + 1 tbsp sugar for 20 minutes.
10. Conclusion
When you need dinner to feel indulgent—but fast, easy, and clean—this sticky honey garlic chicken delivers every time. With just one pan, pantry staples, and 30 minutes, you’ll have a showstoppping main that’s sweet, savory, and satisfying. Try it with our Savory One-Pan Aloo Keema next for a globally inspired twist. Happy cooking—and remember: the best meals are the ones shared with people you love. 🍽️
Print
Sticky Honey Garlic Chicken One Pan Dinner
A quick, healthy, and flavor-packed honey garlic chicken dinner made in one pan—perfect for busy weeknights?
- Total Time: 30 minutes
- Yield: 4 servings 1x
Ingredients
- 1.5 lbs boneless, skinless chicken thighs, cut into chunks
- 3 tbsp honey
- 4 cloves garlic, minced
- 2 tbsp soy sauce (low-sodium)
- 1 tbsp olive oil
- 1 tsp paprika
- 1/2 tsp black pepper
- 1 cup broccoli florets
- 1/2 sweet bell pepper, sliced
- Fresh parsley, chopped for garnish
Instructions
- Season chicken with paprika and pepper.
- Heat olive oil in a large skillet over medium-high heat. Sear chicken for 5–6 minutes until golden.
- Add garlic and cook 30 seconds until fragrant.
- Add soy sauce and honey; stir to coat chicken. Simmer 2–3 minutes until glaze thickens.
- Add broccoli and peppers; cover and steam 4–5 minutes until tender-crisp.
- Garnish with parsley and serve hot.
Notes
- For extra crispiness, broil 1–2 minutes at the end.
- Meal prepTip: Store in airtight containers for up to 4 days.
- Swap broccoli for green beans or zucchini.
- Prep Time: 10 minutes
- Cook Time: 20 minutes
- Method: Stovetop
- Cuisine: American
- Diet: High Protein
Nutrition
- Serving Size: 1 serving
- Calories: 320 Kcal
- Sugar: 18g
- Sodium: 410mg
- Fat: 10g
- Saturated Fat: 2g
- Unsaturated Fat: 6g
- Trans Fat: 0g
- Carbohydrates: 28g
- Fiber: 4g
- Protein: 30g
- Cholesterol: 95mg
