🍗 Sticky Brown Sugar Garlic Chicken — Caramelized, Finger-Licking Good in Under 30 Minutes!
1. Introduction
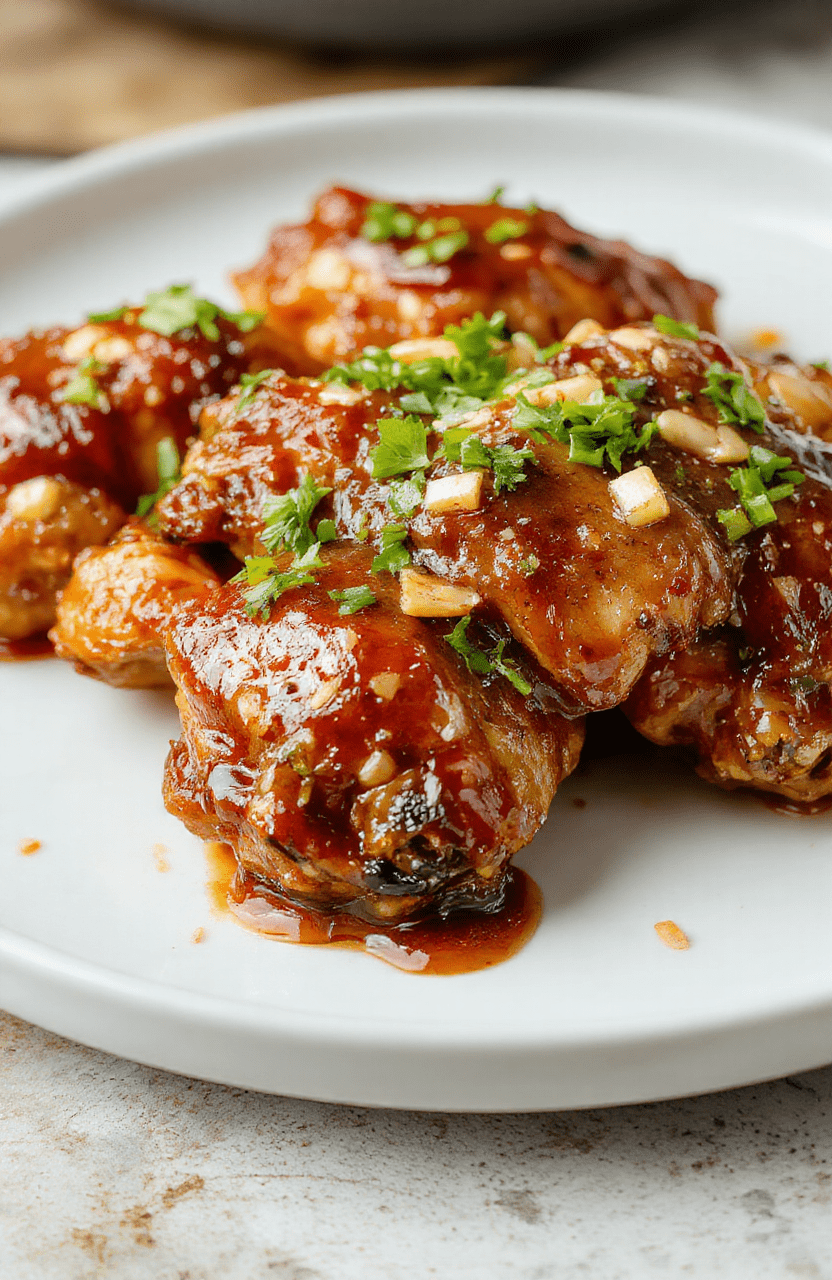
If you’re craving that perfect balance of sticky brown sugar garlic chicken that glistens on your plate, clings to your fingers, and makes your kitchen smell absolutely irresistible—you’ve come to the right place. This recipe delivers a glossy, umami-rich glaze where sweet brown sugar, pungent garlic, and tangy soy sauce dance together in caramelized harmony. Unlike blandtakeout versions, this stovetop creation uses simple pantry staples, no marinating required, and is ready in under 30 minutes. Plus, it pairs beautifully with rice, roasted veggies, or even as a topping for rice bowls. Whether you’re whipping up weeknight dinner or impressing last-minute guests, this garlic soy chicken is your new go-to comfort staple.
2. Why You’ll Love This Recipe
- Ready in 25–30 minutes — faster than delivery and infinitely more satisfying.
- One skillet = one clean-up! Minimal dishes and maximum flavor retention.
- Highly customizable — add heat with red pepper flakes,depth with ginger, or crispiness by finishing under the broiler.
- family-friendly (and crowd-pleasing) — kids adore the sweet notes, adults appreciate the depth.
- Meal-prep & freezer-friendly — reheat in minutes for busy days.
3. Ingredient Notes
The secret to truly extraordinary sticky brown sugar garlic chicken lies in quality and balance. Here’s how each component contributes:
- Dark brown sugar — use packed dark (not light) brown sugar for deeper molasses notes and richer caramelization.
- Fresh garlic — minced (not jarred!) releases more essential oils for that pungent, aromatic punch.
- Low-sodium soy sauce — gives you control over saltiness. Try tamari for a gluten-free option.
- Honey or pure maple syrup — optional, but boosts gloss and sweetness when paired with brown sugar. (For stricter “no-added-sugar” diets, omit—but reduce heat slightly to avoid burning.)
- rice vinegar or pineapple juice — a splash of acid cuts richness and balances the glaze without overpowering.
- Chicken thighs (boneless, skinless) — preferred over breasts for juicy, tender results that won’t dry out during glazing.
- Arrowroot or cornstarch slurry — thickens the sauce exponentially without turning gluey (cornstarch works in a pinch, but arrowroot yields a clearer, shinier finish).
4. Kitchen Tools You Need
You don’t need fancy gear for this recipe—but having the right tools makes cleanup easier and cooking more efficient. Check out these trusted options:
- Ninja Air Fryer Pro Crisp & Roast 4-in-1 — if you prefer roasting the chicken first for extra crisp edges before glazing, this air fryer delivers restaurant-level browning in minutes.
- T-fal 14-Piece Hard Anodized Nonstick Cookware Set — its even-heating deep skillet ensures consistent searing and prevents the sticky glaze from scorching.
- Deluxe 33-Piece Silicone Utensil Set — heat-resistant, non-scratch tools let you scrape the skillet’s sticky sugar glaze safely and thoroughly.
- JoyJolt Airtight Glass Food Storage Set — store leftovers in style and preserve freshness for up to 4 days without odor transfer.
5. How to Make Sticky Brown Sugar Garlic Chicken
Goal: Golden-brown chicken + glossy, glossy glaze that clings like syrup—no excess oil pooling, no watery sauce.
Phase 1: Prep & Pat Dry
Start with 1.5 lbs boneless, skinless chicken thighs, cut into 1.5-inch pieces. Pat them *very* dry with paper towels — moisture is the enemy of browning! Season generously with salt and black pepper.
Phase 2: Sear for Depth
Heat 1 tablespoon neutral oil (like avocado or grapeseed) in a large skillet over medium-high heat. Add chicken and sear for 2–3 minutes per side, until deeply golden brown. Don’t crowd the pan—work in batches if needed. Transfer chicken to a plate.
Phase 3: Build the Glaze Base
Reduce heat to medium. Add 3 tbsp minced garlic and sauté for 30–45 seconds until fragrant—but *not* browned (bitter garlic ruins the dish!). Stir in ⅓ cup packed dark brown sugar, ¼ cup low-sodium soy sauce, and 1 tbsp rice vinegar. Bring to a gentle simmer and let it bubble for 1 minute, dissolving the sugar completely.
Phase 4: Thicken & Glaze
In a small bowl, whisk 1 tsp arrowroot with 2 tbsp cold water. Pour into the skillet while stirring constantly. Return to a simmer—and watch closely as the sauce thickens in 30–60 seconds to a syrupy, sticky consistency. Return chicken (and any accumulated juices) to the pan and toss to coat evenly. Cook for 2 more minutes, letting the glaze cling and caramelize slightly on the surface.
Phase 5: Finish & Serve
Garnish with sesame seeds, sliced green onions, and a squeeze of lime. Serve immediately over steamed jasmine or brown rice, with steamed broccoli or bok choy on the side. For extra flair, broil the glazed chicken for 60–90 seconds at the end to intensify the shine.
6. Expert Tips for Success
- Don’t add garlic too early — garlic burns *fast* in sugary sauces. Add it after reducing heat and never let it brown.
- Use dark brown sugar — light brown sugar lacks the molasses backbone needed for complexity.
- Cook low and slow when reducing glaze — high heat causes sugar to crystallize or burn. Gentle simmer = glossy, smooth sauce.
- Don’t skip the cornstarch slurry — it ensures the sauce clings, not pools. Stir *vigorously* as you add it to prevent lumps.
- Rest chicken for 2 minutes before serving — this lets the glaze reabsorb and coat evenly (sauce will thicken another 10% as it cools).
7. Variations & Substitutions
- Spicy Thai-style — add 1 tbsp sriracha + 1 tsp grated ginger to the glaze base. Top with fresh cilantro.
- Orange Garlic — stir in 2 tbsp passion fruit purée or 1 tbsp orange zest + 2 tbsp fresh juice at the end.
- Vegan option — swap chicken for extra-firm tofu (pressed & cubed) or king oyster mushrooms. Glaze stays the same.
- Grill version — Skillet the chicken first, then finish on a Ninja FlexFlame Outdoor Grill for smoky char.
- Sugar-free版 — replace brown sugar with 2 tbsp allulose (doesn’t crystallize or burn like other substitutes).
8. Storage & Reheating
Refrigerator: Store in an airtight container (like the JoyJolt Glass Food Storage Set) for up to 4 days. Sauce will thicken significantly—stir in 1 tsp water or broth when reheating.
Freezer: Freeze without rice for up to 3 months. Thaw overnight in fridge. Reheat gently on the stovetop over low heat—avoid the microwave if possible to preserve texture.
Reheating: On stove: medium-low until hot. In oven: 350°F for 12–15 minutes. In microwave: 60-second intervals, stirring between each. Pro tip: Add a splash of soy sauce or honey when reheating to refresh the glaze.
9. FAQ
Can I use chicken breast instead of thighs?
Yes—but chicken breasts dry out easily. Reduce sear time to 1.5 minutes per side and avoid overcooking. For juicier results, butterfly the breasts first or cover the skillet with a lid during the last 2 minutes of glazing.
Why is my glaze watery or not sticky?
Mostly likely: the cornstarch slurry wasn’t fully dissolved, or the sauce didn’t reach a simmer. Sugar needs heat *and* time to caramelize and thicken. If it’s too runny, mix ½ tsp extra cornstarch with 1 tbsp cold water and whisk in during the final simmer.
Can I make this ahead for a party?
Absolutely! Prep the dry ingredients and glaze sauce in advance. Store separately in the fridge (up to 2 days). Sear chicken fresh, then add sauce just before serving. The last-minute glaze makes it feel restaurant-fresh.
What’s the difference between this and honey garlic chicken?
Classic “honey garlic chicken” relies primarily on honey, which burns more easily and yields a lighter amber glaze. Our sticky brown sugar garlic chicken uses brown sugar as the base (with optional honey), creating a richer, deeper, almost molasses-like finish with more umami depth. That’s why it’s *stickier* and holds its shine better on chicken.
10. Conclusion
This sticky brown sugar garlic chicken is proof that big flavor doesn’t need complicated steps. It’s sweet, savory, garlicky, and deeply satisfying—perfect for busy weeknights or impressing guests without sweating the kitchen. Pair it with one of our fan-favorites like Ultimate Moist Chocolate Banana Bread (yes, for dessert—and trust us on this combo!), or go full comfort with our Fall-Apart Tender Dump-and-Go Smothered Pork Chops.
Ready to level up your dinner game? Whip up a batch tonight and watch it disappear—fast!
Print
Sticky Brown Sugar Garlic Chicken
Tender chicken thighs glazed with a glossy, sticky-savory-sweet sauce of brown sugar, garlic, soy sauce, and a hint of rice vinegar. A 30-minute weeknight win with restaurant-quality results.
- Total Time: 25 minutes
- Yield: 4 servings 1x
Ingredients
- 1.5 lbs boneless, skinless chicken thighs
- 2 tbsp soy sauce
- 3 tbsp brown sugar
- 4 garlic cloves, minced
- 1 tbsp rice vinegar
- 1 tsp sesame oil
- 1/4 tsp black pepper
- 1 tbsp toasted sesame seeds, for garnish
- 2 green onions, sliced, for garnish
Instructions
- Pat chicken dry and season with pepper.
- Heat 1 tbsp oil in a large skillet over medium-high heat. Sear chicken for 5–6 minutes per side until golden and cooked through (165°F internal temp).
- Remove chicken, reduce heat to low. Add soy sauce, brown sugar, garlic, rice vinegar, and sesame oil to skillet. Simmer 2–3 minutes until syrupy.
- Return chicken to pan, coat in glaze, and cook 1 more minute.
- Serve topped with sesame seeds and green onions.
Notes
- For extra sticky texture, broil 1–2 minutes at the end (watch closely).
- Best with rice or roasted veggies on the side.
- Doubles easily for meal prep — keeps well refrigerated for 3 days.
- Prep Time: 10 minutes
- Cook Time: 15 minutes
- Method: Pan-sear and glaze
- Cuisine: Asian-inspired
Nutrition
- Serving Size: 1 thigh (approx. 6 oz)
- Calories: 310 Kcal
- Sugar: 12g
- Sodium: 720mg
- Fat: 12g
- Saturated Fat: 3g
- Unsaturated Fat: 7g
- Trans Fat: 0g
- Carbohydrates: 18g
- Fiber: 0g
- Protein: 28g
- Cholesterol: 95mg
