🍔 Savory Bacon Cheeseburger Pie: A Comfort Food Masterpiece That’s Easy to Make & Impossible to Resist
1. Introduction
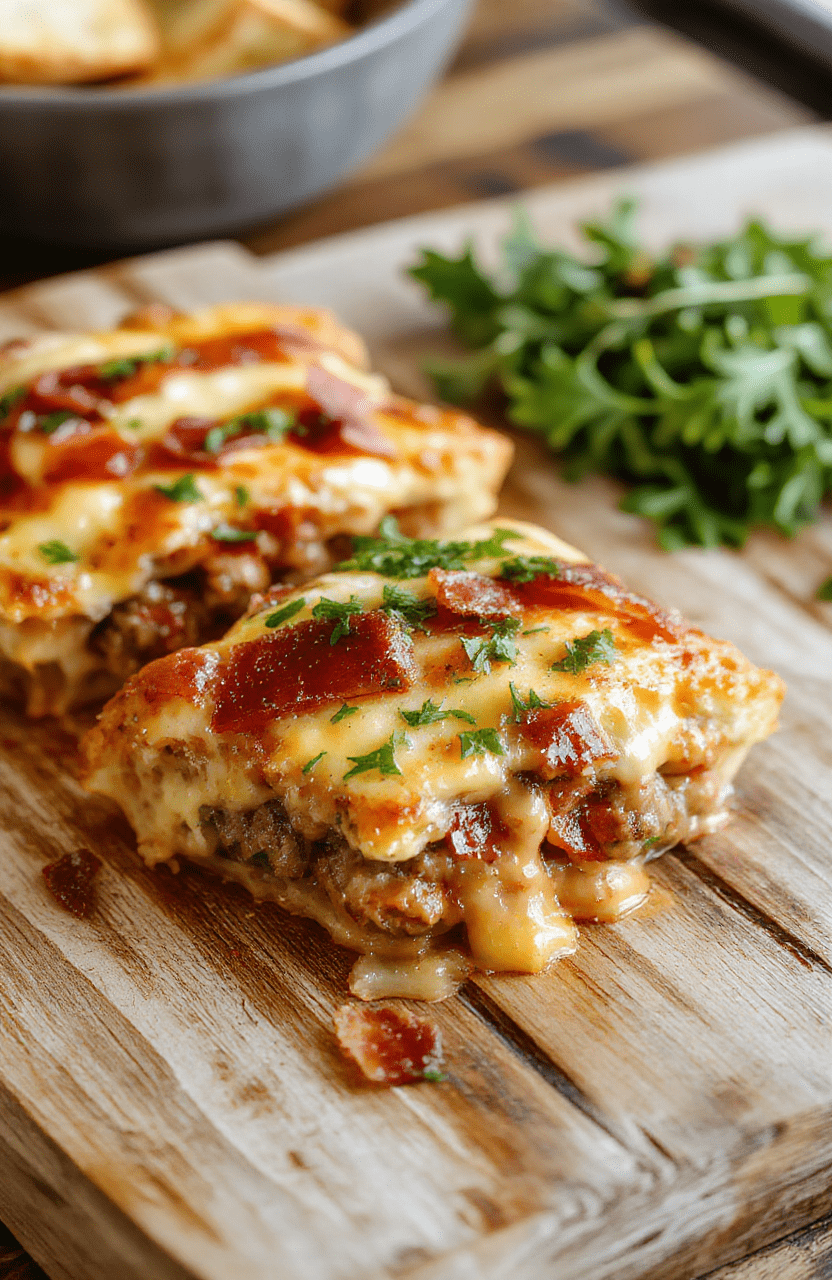
If you’re craving the bold, savory goodness of a classic cheeseburger—but want something warm, hearty, and completely fuss-free—bacon cheeseburger pie is your new favorite dish. This isn’t just a casserole; it’s a layered, golden-crust-topped masterpiece that tastes like the best burger joint meal, reimagined for your kitchen. With crumbled beef, crispy bacon, melted cheese, and pickles all nestled under a buttery, flaky crust, this recipe strikes the perfect balance between nostalgic comfort and smart, indulgent cooking.
Built for busy weeknights (and impressively scalable for game-day crowds), this bacon cheeseburger pie delivers big flavor without the fuss. Think of it as an easy carnivore dinner that still feels elegant—thanks to the savory depth of bacon and the tangy-sweet pop of pickles. Ready in under 45 minutes, it’s the kind of dish that makes everyone at the table pause mid-bite and say, “Wait… did you actually make this?”
2. Why You’ll Love This Recipe
- ✅ One-pan (then one-dish!) wonder — start on the stove, finish in the oven
- ✅ Total time: 40 minutes — faster than takeout, way more satisfying
- ✅ Budget-friendly — Uses pantry staples and a few quality proteins
- ✅ Meal prep–friendly — reheats beautifully for lunch or leftovers
- ✅ Crowd-pleaser — Kids, meat-lovers, and skeptics alike approve
3. Ingredient Notes
Quality is non-negotiable in a bacon burger casserole — but don’t stress, this recipe keeps things simple. Here’s why each ingredient matters:
Ground beef (80/20) — Leanness matters. Too lean, and your pie dries out. Too fatty? You’ll get a greasy mess. 80/20 hits the sweet spot: rich, juicy, and flavorful.
Thick-cut bacon — Not just for crunch. Cooking the bacon first builds the flavor base for the entire dish. I prefer applewood-smoked for a subtle sweetness that complements the beef beautifully.
Dehydrated onions — Not optional! They rehydrate instantly in the hot meat, offering concentrated/oniony depth without the crunch or moisture that raw onions bring. Fresh onions release too much water and can make the filling soggy.
Worcestershire sauce + Dijon mustard — These two umami powerhouses elevate the meat mixture from good to Restaurant-worthy.
Puff pastry (store-bought, but high-quality) — The star of the topping. I always use Pepperidge Farm Frozen Puff Pastry — it’s consistent, flaky, and requires zero effort. Roll it out *after* chilling for maximum lift.
Sharp cheddar + American cheese — Cheddar gives punch; American adds that signature melty, gooey cheeseburger texture. Grated > sliced for even melting.
4. Kitchen Tools You Need
You don’t need a full pro kitchen to make this — but the right tools make all the difference in consistency and ease:
T-fal 14-Piece Hard Anodized Nonstick Cookware Set — The deep skillet included is perfect for browning the beef and building that rich fond. Hard anodized means no hot spots, and the nonstick surface makes cleanup a breeze (no scrubbing burnt cheese!).
Ninja Air Fryer Pro Crisp & Roast 4-in-1 — While I bake this in the oven for the classic golden top, if you’re short on time or want extra-crispy edges, you can finish the pie for 3–4 minutes in the air fryer mode. Result? Crimpy, golden crust with zero risk of sogginess.
JoyJolt Airtight Glass Food Storage Set — This bacon cheeseburger pie reheats wonderfully. Store leftovers in these 2-cup glass containers — stackable, microwave-safe, and freezer-friendly for up to 3 months. Plus, the clear design helps you find your favorite meals in the fridge faster.
Clever Fox DIY Family Recipe Journal — Seriously, *write this one down*. Family members will ask for it weekly. The journal’s elegant layout makes it fun to collect your go-to recipes — and you’ll be proud to hand it down.
5. How to Make Bacon Cheeseburger Pie
Three simple phases—build, layer, bake.
Phase 1: Brown & Sauté (10 mins)
Begin by rendering thick-cut bacon in a large, oven-safe skillet (like cast iron or the T-fal skillet above) over medium heat. Flip often until crisp (5–6 mins), then transfer to a paper towel-lined plate. Leave the fat in the pan — that’s flavor gold.
Add chopped onion and dehydrated onions to the bacon fat. Sauté until softened and fragrant, about 2 minutes. Add ground beef, breaking it up with a wooden spoon until browned (no pink remaining). Drain *all but 1 tbsp* of fat.
Stir in ketchup, Worcestershire, Dijon mustard, salt, and pepper. Simmer 2 minutes. Fold in half the crispy bacon and half the cheddar. Taste — adjust seasoning. This is your filling.
Phase 2: Prep & Layer (5 mins)
Preheat oven to 400°F (200°C). Roll out chilled puff pastry on a lightly floured surface to fit your skillet with 1–2 inches of overhang.
Spoon the warm filling into the skillet. Sprinkle remaining American cheese over the top — it’ll melt into a luscious blanket.
Drape the pastry over the filling, crimping edges into the skillet’s sides. Trim excess, then cut 2–3 small slits in the center for steam to escape. Brush lightly with egg wash (1 egg + 1 tbsp water) for that perfect golden shine.
Phase 3: Bake & Rest (25 mins)
Bake for 22–25 minutes, until the pastry is deep golden and puffed. Let it rest 10 minutes *at minimum* — this allows the filling to set (so it doesn’t gush when you slice!).
Garnish with remaining bacon and pickles (sweet or dill, your call). Serve warm, with a side salad or roasted potatoes if you’re feeling extra indulgent.
6. Expert Tips for Success
- No overfilling! Keep the filling level just below the rim — puff pastry needs room to rise. If it’s too full, it may overflow or collapse.
- Chill the pastry *before* laying it on. Warm dough shrinks and cracks. If it warms too fast, pop it in the freezer for 5 minutes.
- Don’t skip the rest time. Even if hunger strikes, wait. Patience = clean slices and rich layers.
- Make it crispier: For extra flakiness, bake on a preheated pizza stone or steel for the first 10 minutes, then lower heat.
- To prevent a soggy bottom: Brush the inside of the pastry with a thin layer of melted butter *before* adding filling — it acts as a moisture barrier.
7. Variations & Substitutions
Gluten-free — Use a gluten-free puff pastry (like Whollywholesome) or swap the top for a simple biscuit topping (butter, flour, baking powder, milk).
Low-carb — Skip the pastry entirely. Top with a cheese crisp or low-carb biscuit mix and bake until golden.
Pork-free — Substitute bacon with turkey bacon, smoked tempeh, or just increase beef to 2 lbs (add 1 tsp smoked paprika for depth).
Carnivore 2.0 — Omit ketchup, mustard, and pickles. Use quality ground beef + bacon + salt only. Add a layer of cooked liver for extra nutrients.
Veggie upgrade (for meat-reducers) — Add sautéed mushrooms or roasted bell peppers to the filling for extra umami without overpowering the meat.
8. Storage & Reheating
Cool completely before covering. Store slices in airtight containers in the fridge for up to 4 days.
Reheating — For best texture, reheat in a 350°F oven for 15–20 minutes (tent with foil after 10 mins to avoid over-browning). For speed, microwave individual slices for 60–90 seconds — but know the crust will soften.
Freezing — Freeze before baking. Assemble, wrap tightly in plastic + foil, and freeze. Bake straight from frozen at 375°F for 45–50 minutes (add 10–15 mins if frozen).
9. FAQ
Can I make this ahead? Yes! Prepare filling and pastry separately, refrigerate for up to 2 days, then assemble just before baking.
Why did my pastry sink? Most likely due to cutting into it too soon or overfilling the skillet. Let it rest, and keep filling ½ inch below rim.
Can I use crescent rolls instead of puff pastry? Sure — unroll, press over filling, pinch seams. Bake at 375°F for 18–22 mins. The crust won’t be as flaky, but it’s still delicious.
Is this kid-friendly? Absolutely. Serve with ketchup on the side for dipping, or let kids assemble mini “bacon burger bites” — cut the pie into 1-inch squares and top with sour cream.
10. Conclusion
The beauty of this bacon cheeseburger pie is how it turns humble ingredients into pure comfort. It’s the kind of dish that starts a conversation (“You mean this is *real food*?”), wins over picky eaters, and makes your kitchen smell like a summer backyard barbecue. Whether it’s a quiet family dinner or a last-minute guest, this recipe delivers joy in every bite.
Give it a try — and come back to tell me your favorite tweak (I’m team dill pickle all the way 🥒). While you’re here, check out my Easy Chicken Sausage Orzo for a lighter companion, or the Crispy Oven-Roasted Potatoes for a side that holds its own against this hearty pie.
Happy cooking — and remember, the best meals aren’t just eaten. They’re *memorized*.
Print
Savory Bacon Cheeseburger Pie
A savory, crispy-crust pie filled with ground beef, bacon, onions, and melted cheese — the ultimate carnivore-friendly comfort dish in minutes.
- Total Time: 55 minutes
- Yield: 6 servings 1x
Ingredients
- 1 double-crust pie crust (or store-bought)
- 1 lb ground beef (80/20)
- 4 slices bacon, cooked & crumbled
- 1 medium onion, finely chopped
- 2 cups shredded cheddar cheese
- 1 egg, beaten (for egg wash)
- 1 tsp garlic powder
- 1 tsp onion powder
- 1 tsp smoked paprika
- Salt & black pepper to taste
- Fresh parsley for garnish (optional)
Instructions
- Preheat oven to 375°F (190°C). Roll out bottom crust into a 9-inch pie dish.
- In a skillet over medium heat, cook ground beef until browned; drain excess fat.
- Add chopped onion to beef and cook until soft (5–6 mins). Stir in onion powder, garlic powder, paprika, salt, and pepper.
- Return beef mixture to bowl. Stir in 1 1/2 cups cheddar cheese and bacon.
- Pour filling into pie crust. Roll out top crust over filling, seal edges, and crimp.
- Cut 2–3 vents in top crust. Brush with beaten egg.
- Bake 35–40 mins until golden and bubbly. Cool 10 mins before slicing. Garnish with parsley.
Notes
- For extra richness, add a dollop of ketchup or mustard to the filling.
- Let pie rest before slicing to set the filling and avoid mess.
- Vegetarian option: Swap beef for plant-based crumbles and use vegan cheese.
- Prep Time: 15 minutes
- Cook Time: 40 minutes
- Method: Baking
- Cuisine: American
- Diet: High-Protein
Nutrition
- Serving Size: 1 slice
- Calories: 480 Kcal
- Sugar: 2g
- Sodium: 720mg
- Fat: 34g
- Saturated Fat: 16g
- Unsaturated Fat: 15g
- Trans Fat: 1g
- Carbohydrates: 25g
- Fiber: 1g
- Protein: 24g
- Cholesterol: 95mg
