
🍓🍇 Healthy Frozen Yogurt Granola Cups for Breakfast on the Go 🥄☀️
1. Introduction
Imagine pulling into work or dropping kids off at school with a healthy frozen yogurt granola cups waiting in your cooler bag—creamy, crunchy, naturally sweetened, and packed with protein to fuel your morning without the sugar crash. These little cups combine the best of both worlds: the cool, tangy richness of Greek yogurt and the satisfying crunch of homemade granola, all held together in a no-fuss, grab-and-go format. Perfect formeal prep weekends, post-workout snacks, or quick breakfasts on busy weekdays, they cut through the clutter of frozen breakfast bars and packaged yogurts with real, whole ingredients and zero guilt.
2. Why You’ll Love This Recipe
- ✅ Ready in under 30 minutes (plus 2 hours freezing)—no baking required!
- ✅ High-protein frozen yogurt cups with 15–20g protein per serving when using full-fat Greek yogurt
- ✅ One-bowl assembly—no fancy tools or kitchen skills needed
- ✅ Freezer-friendly for batch prep and long-term storage
- ✅ Naturally sweetened with ripe banana and a touch of pure maple syrup
3. Ingredient Notes
Quality matters when it comes to frozen yogurt—so let’s talk about what makes each ingredient *work*.
The Yogurt Base
I recommend full-fat Greek yogurt for creaminess and satiety. Fat carries flavor and slows sugar absorption—critical for avoiding that mid-morning crash. If you prefer plant-based, choose an unsweetened, high-protein coconut or almond yogurt (check for live active cultures on the label).
The Granola Layer
Autobrewed homemade granola trumps store-bought every time: you control added sugar (aim for ≤4g per serving) and oil type (olive or avocado oil > vegetable oil). I toast rolled oats with cinnamon, sea salt, and chopped pecans for a nutty, aromatic crunch that balances the yogurt’s tang. Pro tip: Toasting the oats brings out their natural sweetness and prevents sogginess.
Binders & Sweeteners
One ripe banana mashed into the yogurt adds natural sweetness, potassium, and a velvety texture—no added sugar needed. A drizzle of pure maple syrup or raw honey adds depth without refined sugars. For a vegan option, useDate syrup or monk fruit blend.
4. Kitchen Tools You Need
These tools make the process faster, cleaner, and more successful—especially if you love batch-prepping breakfasts.
The Cuisinart 2-Quart Stainless Steel Ice Cream Maker with LCD Timer is overkill for this recipe—but if you love homemade frozen desserts year-round, it’s a game-changer. For these granola cups, though, you only need a few essentials:
- A 12-cup muffin tin (standard size)
- Mini muffin liners or parchment cups (reusable silicone help with clean removal)
- A medium mixing bowl (stainless steel holds cold well)
- A silicone spatula (to scrape every last drop of yogurt)
- A small baking sheet for toasting granola
If you’re looking to upgrade your mornings: the Ninja Air Fryer Pro Crisp & Roast 4-in-1 can toast granola in 8 minutes—no oven preheat, perfect browning, and easy cleanup. I use it daily for quick snack prep!
5. How to Make Healthy Frozen Yogurt Granola Cups
Phase 1: Toast the Granola (~10 minutes)
Preheat oven to 325°F (165°C). In a bowl, toss 1½ cups rolled oats, ½ cup chopped pecans, 2 tbsp flaxseeds, ½ tsp cinnamon, and ¼ tsp sea salt. Add 1 tbsp melted coconut oil and 1 tbsp maple syrup—mix until evenly coated. Spread on a baking sheet and toast for 10–12 minutes, stirring halfway. Let cool completely (warm granola will melt the yogurt!).
Phase 2: Prep the Yogurt Mixture (~5 minutes)
In a large bowl, combine 2 cups full-fat Greek yogurt, 1 ripe mashed banana, 1 tbsp lemon juice (to brighten flavor), ½ tsp vanilla extract, and a pinch of salt. Stir until smooth and creamy. Gently fold in 1 cup of the cooled granola—leave some texture for crunch.
Phase 3: Assemble & Freeze (~10 minutes total)
Line a 12-cup muffin tin with paper or silicone cups. Spoon the granola mixture into each cup, pressing gently to compact (this prevents crumbling). Freeze uncovered for 2–3 hours until solid, then wrap each cup individually in parchment and store in an airtight container.
Serving tip: Let thaw at room temp for 5–7 minutes before eating—this softens the edges just enough for the best spoonable texture.
6. Expert Tips for Success
Avoid soggy granola: Never add warm granola to yogurt—it steams and softens instantly. Always cool granola on a wire rack after toasting.
Prevent ice crystals: Press plastic wrap directly onto the surface of the yogurt mixture before freezing if making ahead more than 48 hours. Oxygen exposure = icy texture.
Layer order matters: Always add granola *into* the yogurt—not on top before freezing. This lets the yogurt grip the granola, holding cups together when removed from molds.
Boost protein: Stir 1–2 scoops of unflavored or vanilla collagen peptides or plant-based protein powder into the yogurt. Just add 1–2 tbsp milk to thin it out if needed—it thickens as it freezes.
7. Variations & Substitutions
🌿 Vegan: Use unsweetened coconut yogurt + 2 tbsp nut butter + 1 tbsp chia seeds (soaked 10 min in 3 tbsp water) as binder.
🥜 Nut-free: Swap pecans for sunflower seeds and pumpkin seeds in the granola. Omit honey if strict vegan—use brown rice syrup instead.
🍒 Flavor twists:
- Berry Bliss: Fold in ¼ cup freeze-dried raspberries + 2 tbsp berry chia jam before freezing
- Peanut Butter Cup: Swirl in 2 tbsp melted peanut butter + roll edges in crushed pretzels
- Tropical: Use pineapple Greek yogurt + toasted coconut + chopped macadamias
8. Storage & Reheating
Fridge: Up to 3 days (covered). Texture softens slightly but stays delicious.
Freezer: Up to 3 months. I recommend individually wrapping and labeling with dates—granola is always best within 6 weeks.
Reheating: Not needed! These are meant to be eaten cold or slightly thawed. If frozen solid, let sit at room temp for 5–7 minutes before enjoying.
9. FAQ
Can you use regular yogurt instead of Greek?
You can—but you’ll need to strain it first. Place regular yogurt in a cheesecloth-lined sieve over a bowl for 1–2 hours in the fridge to remove excess whey. Otherwise, cups may be too soft or leaky.
Are these gluten-free?
Yes—if you use certified gluten-free rolled oats and check all other ingredients (some granola brands include barley malt). Most brands of flaxseeds and nuts are GF, but always verify.
Can you make these without freezing?
They won’t hold shape—but you can serve as a parfait! Layer yogurt + granola in a jar, seal, and refrigerate for up to 2 days. Add granola right before eating to keep crunch.
How do you get the cups out cleanly?
Run the bottom of the muffin tin under warm water for 10 seconds—just enough to loosen. Then invert gently. Silicone molds release easier than metal, but both work with this trick!
10. Conclusion
These healthy frozen yogurt granola cups prove that nutritious breakfasts don’t require sacrifice—or hours in the kitchen. With every bite, you get creamy, satisfying yogurt, a satisfying crunch, and real food ingredients that actually fuel your day. Batch-make them on Sunday, and watch your weekday chaos melt away—one delicious, no-mess cup at a time.
Print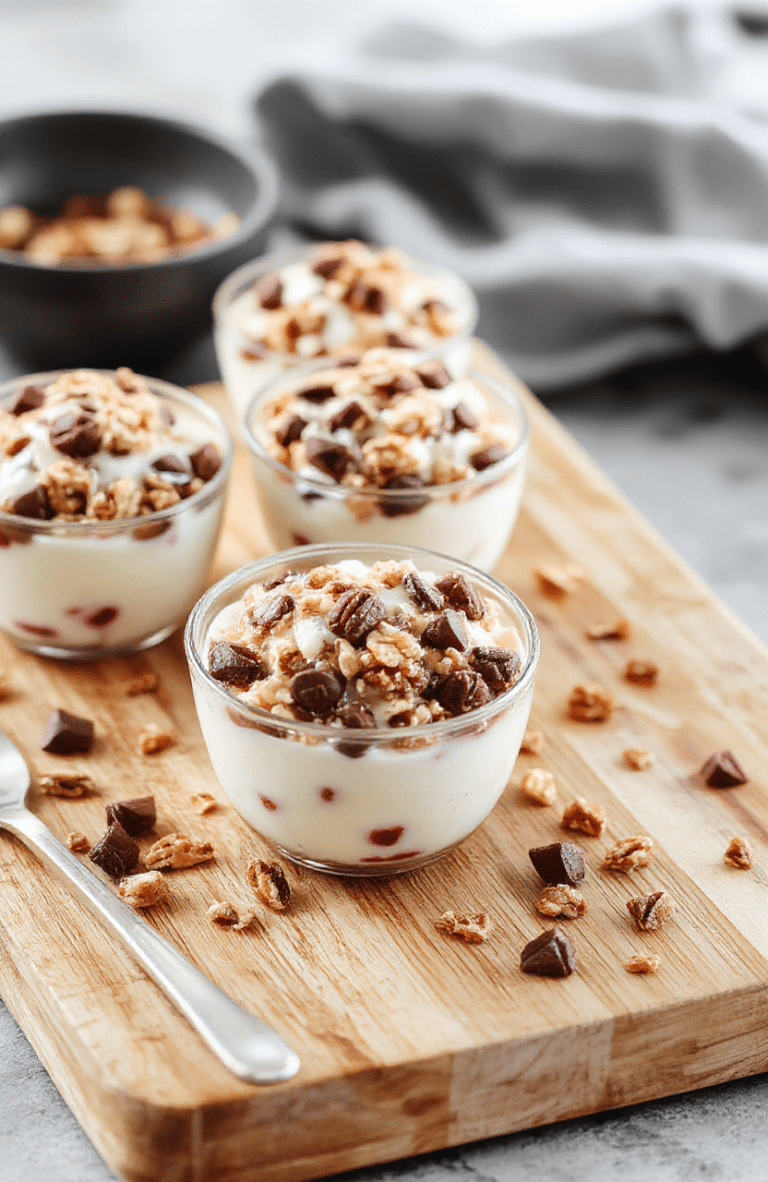
Healthy Frozen Yogurt Granola Cups for Breakfast on the Go
Make-ahead, portable frozen yogurt granola cups packed with protein, fiber, and natural sweetness — ideal for breakfast, snacks, or lunchboxes.
- Total Time: 3 hours 15 minutes
- Yield: 6 cups 1x
Ingredients
- 2 cups plain Greek yogurt (or plant-based alternative)
- 1/4 cup honey (or maple syrup for vegan)
- 1 tsp vanilla extract
- 1 cupRolled oats
- 1/2 cup granola (store-bought or homemade)
- 1/2 cup chopped nuts (e.g., almonds or walnuts)
- 1/2 cup mixed berries (fresh or frozen, chopped)
- Optional: Chia seeds or flaxseed for extrafiber
Instructions
- In a mixing bowl, whisk together Greek yogurt, honey, and vanilla until smooth.
- Stir in oats, granola, nuts, and half the berries until just combined.
- Spoon mixture into muffin paper liners or silicone cup molds, filling 3/4 full.
- Top each cup with remaining berries and a light drizzle of honey.
- Freeze for at least 3 hours, or until firm.
- Store in an airtight container in the freezer for up to 1 week. Thaw 5–10 minutes before serving.
Notes
- For dairy-free: use coconut or almond-based yogurt.
- Gluten-free: ensure oats and granola are certified gluten-free.
- Customize with seasonal fruit (e.g., mango in summer, apples in fall).
- These cups hold up well for lunch packs — no reheating needed!
- Prep Time: 15 minutes
- Cook Time: 0 minutes
- Method: Freezing
- Cuisine: American
- Diet: Vegetarian
Nutrition
- Serving Size: 1 cup
- Calories: 185 Kcal
- Sugar: 12g
- Sodium: 45mg
- Fat: 7g
- Saturated Fat: 3g
- Unsaturated Fat: 3g
- Trans Fat: 0g
- Carbohydrates: 22g
- Fiber: 3g
- Protein: 11g
- Cholesterol: 15mg
