
🧀 Crispy Crust, Dreamy Interior: Easy No-Knead Cheddar Bread That Scores Big (Even for Beginners!) 🥖
1. Introduction
There’s something profoundly satisfying about breaking open a freshly baked loaf of easy no-knead cheddar bread—the crackle of the crust, the sharp, buttery aroma, the melt-in-your-mouth crumb streaked with vivid yellow cheddar. This recipe is my go-to when I want bakery-quality bread without the labor (or the flour-dusted panic). Leveraging the same no-knead magic popularized by Jim Lahey, this bread transforms simple pantry staples into something magical—all in one bowl, no fancy equipment required.
Ready in under an hour of active prep and just 45 minutes of baking (plus resting), it’s the perfect weekend project—or an emergency weekday savior for when dinner guests arrive early. Pair it with a steaming bowl of Healing Greek Immune-Boosting Soup, or use thick slices as the base for a Cheesy Burrito Bake with extra sour cream drizzle. Let’s get baking!
2. Why You’ll Love This Recipe
- ✅ No kneading, no mess, no stress: Just stir, fold, and forget—perfect for beginners or busy weeknights.
- ✅ Bread in under 2 hours: From prep to table in ~115 minutes total (including rest time).
- ✅ One-bowl, pantry-stable ingredients: Flour, water, salt, yeast, and sharp cheddar—all you likely already have.
- ✅ Customizable & kid-approved: Swap cheddar for gouda, add caramelized onions, or stir in jalapeños for a spicy twist.
- ✅ Dog-friendly scraps (in moderation!): That crust? Great for your pup’s treat jar.
3. Ingredient Notes
Don’t skip the details here—these aren’t just measurements; they’re your quality control.
Flour: I use unbleached all-purpose flour (like King Arthur or Bob’s Red Mill) for its reliable rise and tender texture. Bread flour works too—but can yield a denser loaf, so reduce water by 1–2 tbsp.
Cheese: Old or sharp white cheddar is ideal. Its lower moisture content prevents sogginess, and its bold flavor won’t get lost during baking. *Pro tip:* Grate it yourself—pre-shredded cheese contains anti-caking agents that hinder melt and structure.
Yeast: Active dry yeast is fine, but instant yeast (like SAF-Instant) skips the proofing step and gives a faster rise. No need to warm the water if using instant.
Water: Use filtered or bottled if your tap water tastes chlorine-heavy—chlorine can inhibit yeast activity.
Salt: Fine sea salt dissolves more evenly than kosher in this wet dough. Skip iodized salt—it can impart a bitter, metallic note.
4. Kitchen Tools You Need
You don’t need a pro kitchen—just a few key tools to make success inevitable.
• Heavy-Duty Dutch Oven: This is non-negotiable for crust development. I rely on my enameled cast iron—retains heat beautifully, traps steam, and gives that bakery-style crackle. The T-fal 14-Piece Hard Anodized Nonstick Cookware Set includes an oven-safe pot if you’re upgrading your whole set.
• Plastic Dough Scraper: A game-changer for handling this high-hydration dough. The Deluxe 33-Piece Silicone Utensil Set includes a handy bench scraper that won’t melt near hot pans.
• Instant-Read Thermometer: Ensures your water is 100–110°F—critical for activating yeast without killing it. If your dough never rose, it was likely too hot or too cold.
• Stand Mixer (Optional): Though no-knead, you *can* use a KitchenAid Artisan 5-Quart Stand Mixer with the dough hook for the first stir—freeing your hands for folding later.
• Airtight Storage: Keep leftovers fresh with the JoyJolt Airtight Glass Food Storage Set—perfect for slicing and storing for meals all week.
5. How to Make Easy No-Knead Cheddar Bread
This method follows the no-knead formula: mix, rest (autolyse), fold, shape, rise, bake. The secret? Patience between folds—and steam during baking.
Phase 1: Mix & Rest (15 min active + 2-hour autolyse)
In a large bowl, whisk together:
- 3 cups (360g) all-purpose flour
- 1 tsp (6g) fine sea salt
- ½ tsp (0.5g) instant yeast
Add:
- 1¼ cups (300ml) warm water (105–110°F)
- 1 cup (120g) freshly grated sharp white cheddar
Stir with a wooden spoon until no dry flour remains—it’ll be shaggy and sticky. Cover with a damp kitchen towel or plastic wrap and let rest for 2 hours at room temperature. This “autolyse” lets the flour hydrate fully, building gluten naturally and improving flavor. You’ll see bubbles forming on the surface and the dough increase slightly—*this* is your sign it’s ready.
Phase 2: Folds & Builds Strength (4 fold sessions over 2 hours)
Every 30 minutes for the next 2 hours, perform a fold:
- Wet your hands with cold water.
- Grasp one edge of the dough, lift it gently, and fold it toward the center.
- Rotate the bowl 90° and repeat 3 more times.
- After folding, the dough will feel tighter and smoother.
Don’t worry if it sticks—just wet your hands again. These folds build structure without kneading, creating those beautiful air pockets in the final loaf.
Phase 3: Shape & Final Rise (1 hour)
Lightly flour a couche, parchment paper, or a floured towel. Gently scrape dough onto a floured surface. With floured hands, shape into a loose round: pull the edges inward, tucking under to create surface tension. Seam side up. Place in a floured proofing basket or bowl lined with a floured towel.
Cover and let rise 1 hour at room temp—or for richer flavor, refrigerate overnight (up to 18 hours). Cold fermentation develops complexity and makes the crust even crispier.
Phase 4: Bake (55–60 min)
30 minutes before baking, preheat oven to 450°F (230°C) with your Dutch oven *inside* it—critical for heat retention.
Once ready, carefully remove the hot pot. Turn dough out (seam side down), score the top ¼-inch deep with a sharp knife or razor (I use a bread lamer—don’t skip this; it lets steam escape).
Bake covered for 30 minutes. Uncover, reduce heat to 425°F (220°C), and bake 15–20 more minutes until deep golden brown and reaching 205–210°F internal temp. Let cool *completely* on a wire rack—this step is sacred. Cutting too soon will collapse the crumb.
6. Expert Tips for Success
From trial, error, and yes—even burnt loaves—here’s what makes or breaks this bread:
- Don’t skip the preheated Dutch oven: Adding cold dough to a cool pot = flat, gummy bread.
- Use a spray bottle to add steam: If your oven lacks a steam tray, mist the walls before closing the lid—createsthat coveted crust.
- Grate cheese cold: Warm cheese melts into the dough and weakens structure. Just 10 minutes in the freezer beforehand = big wins.
- Rise in a draft-free spot: Near the stove or oven? Too hot. Near A/C vent? Too cold. Your countertop, away from windows, works best.
- Cool completely: Even if it smells like heaven—wait! The interior finishes setting as it cools.
7. Variations & Substitutions
Diet needs or flavor cravings? Try these swaps:
- Gluten-Free: Use a 1:1 GF blend with xanthan gum (like King Arthur). Add 1 extra tbsp water—GF dough is wetter.
- Dairy-Free: Swap cheddar for ½ cup nutritional yeast + ¼ cup shredded jack cheese (check for dairy-free).
- Veggie Boost: Stir in ½ cup finely chopped roasted red peppers or sautéed leeks (squeeze out excess moisture!).
- Herbed Upgrade: Add 2 tbsp fresh rosemary or thyme, plus 1 tsp onion powder.
- Sourdough Version: Replace yeast with ½ cup (120g) active sourdough starter, and add ¾ cup (180ml) water + ¼ cup (30g) flour. Bulk ferment 4–6 hours.
8. Storage & Reheating
Room Temp: Wrap cooled loaf in a clean kitchen towel. Stays fresh 2–3 days. Reheat slices in a 350°F oven for 5–7 minutes to restore crunch.
Fridge: Not recommended—it dries the crumb. But if needed, wrap tightly in plastic and reheat in a toaster oven.
Freezer: Slice, double-wrap in plastic, then foil. Freeze up to 3 months. Toast straight from frozen—no thawing needed!
Revive Stale Bread: Slice thick, brush with olive oil, season, and bake at 375°F for 8–10 minutes. Voilà—homemade croutons.
9. FAQ
Why is my no-knead bread dense?
Most often: under-proofed or over-floured. Your dough should feel supple and slightly sticky—not dry or crumbly. Also, ensure your yeast is fresh (check expiration date).
Can I bake this without a Dutch oven?
Yes! Use a rimmed baking sheet + oven-safe bowl as a cover, or bake in a loaf pan at 375°F for 40–45 min. But it won’t develop that artisan crust—just be mindful of steam.
Can I make this vegan?
Absolutely. Omit cheese and add 2 tbsp nutritional yeast + 1 tbsp miso paste for umami depth. Use flax egg (1 tbsp ground flax + 3 tbsp water) if enriching is desired.
Why did my bread stick to the Dutch oven?
Was the pot *not* well-floured? Did you use parchment? (I always do.) Or did you leave it in the pot too long after baking—cooling on a rack is key.
10. Conclusion
There you have it: your new favorite easy no-knead cheddar bread. With its crisp exterior, cheese-streaked interior, and irresistible aroma, it proves that simple ingredients + mindful technique = bakery-level joy. Serve it as a side to your Crispy Chicken Caesar Sandwich, slice it into a Mediterranean Bowl, or enjoy it warm with a drizzle of olive oil and flaky sea salt. Now go forth—and bake boldly. 🍽️
Print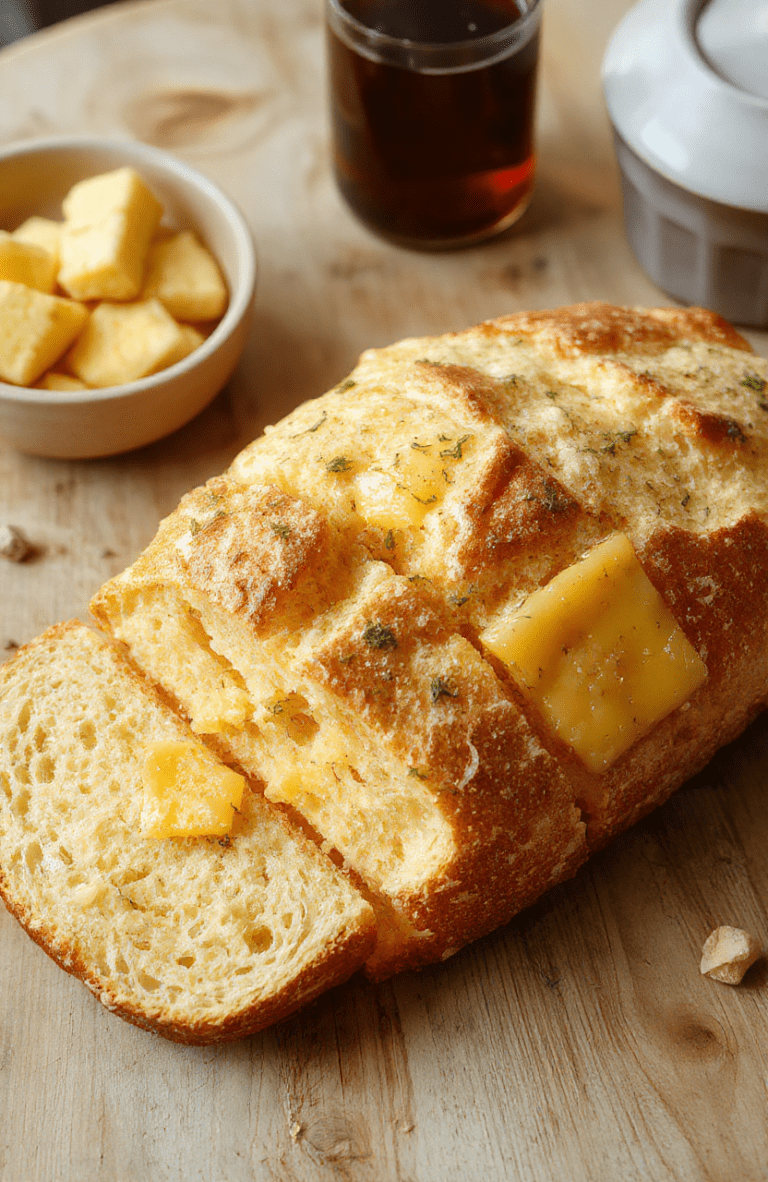
Easy No-Knead Cheddar Bread
A foolproof, no-knead cheddar bread baked in a Dutch oven that delivers a crispy crust and ultra-soft, cheesy interior—perfect for sandwiches, soups, or snacking.
- Total Time: 2 hours 30 minutes (includes rise time)
- Yield: 1 loaf 1x
Ingredients
- 3 cups (360g) all-purpose flour
- 1 tsp instant yeast
- 1 tsp salt
- 1 1/4 cups (300ml) warm water (110°F)
- 1 cup (100g) shredded sharp cheddar cheese
- 1 tbsp honey
- 1 tbsp melted butter (plus extra for greasing)
Instructions
- In a large bowl, whisk together flour, yeast, and salt.
- Add warm water, honey, and melted butter; stir until a shaggy dough forms.
- Fold in shredded cheddar cheese and mix until just incorporated.
- Cover bowl with plastic wrap and let rise at room temperature for 12–18 hours (overnight).
- Preheat Dutch oven with lid inside at 450°F (230°C) for 30 minutes.
- Transfer dough to parchment paper, shape into a round loaf, and carefully lower into the hot Dutch oven.
- Cover and bake for 30 minutes. Uncover, reduce heat to 425°F (220°C), and bake 15–20 more minutes until deep golden brown.
- Cool on a wire rack before slicing.
Notes
- For extra flavor, add 1/2 tsp garlic powder or dried rosemary to the dough.
- Dough can be refrigerated up to 24 hours before baking—just bring to room temp 30 mins before baking.
- Ensure your Dutch oven is oven-safe up to 450°F.
- Prep Time: 15 minutes
- Cook Time: 45 minutes
- Method: Baking
- Cuisine: American
- Diet: Vegetarian
Nutrition
- Serving Size: 1 slice (1/12 loaf)
- Calories: 185 Kcal
- Sugar: 2g
- Sodium: 290mg
- Fat: 7g
- Saturated Fat: 4g
- Unsaturated Fat: 2.5g
- Trans Fat: 0.2g
- Carbohydrates: 23g
- Fiber: 1g
- Protein: 7g
- Cholesterol: 20mg
