
creamy pierogi casserole 🥔🔥 — A Warmer-Than-Hug Comfort Food Masterpiece
1. Introduction
There’s something deeply satisfying about pulling a steaming, golden-brown pan of creamy pierogi casserole out of the oven. It’s not just food—it’s nostalgia in a dish: tender pierogi, smoky kielbasa, and a rich, velvety cheese sauce all bubbling at the edges like a cozy Polish dinner party in your kitchen. This one-pan kielbasa dinner is the perfect bridge between tradition and convenience—no boiling pierogi separately, no fussy layering. Just throw it together, bake, and let the aroma of caramelized onions, garlic, and dill sweep you into winter hibernation mode. Whether you’re feeding a hungry family or craving soul food with Eastern European flair, this creamy pierogi casserole delivers pure comfort with every bite.
2. Why You’ll Love This Recipe
- Ready in under 50 minutes—faster than ordering takeout, but infinitely more delicious
- One-pan wonder—fewer dishes means more time to relax (or sneak a bite)
- Make-ahead friendly—assemble up to 24 hours ahead, refrigerate, then bake when ready
- Crowd-pleasing—a hit at potlucks, holiday dinners, or casual weeknights
- Customizable protein & veggie power—swap kielbasa for smoked sausage or add mushrooms and spinach
3. Ingredient Notes
Great flavor starts with smart swaps and intentional choices. Here’s how to elevate your polish comfort food to restaurant quality:
- Frozen pierogi — Opt for onion & cheese or potato & cheddar varieties. No need to thaw or boil—just add frozen directly to the casserole. The steam inside helps create that dreamy creaminess without extra prep.
- Kielbasa — Choose Wegloska (smoked Polish kielbasa) for deep, garlicky smoke. If unavailable, smoked Spanish chorizo or Andouille adds great depth. Slice ¼" thick—thicker slices stay juicy.
- Heavy cream & sour cream — The fat content is non-negotiable: low-fat substitutes curdle or turn watery. Full-fat cream creates that luxurious, clingy sauce.
- Yellow onion & garlic — Sauté until deeply golden, not just translucent. Caramelization adds sweet backup notes to cut the richness.
- Dill — Fresh is ideal, but 1 tsp dried works in a pinch. Stir it in *after* baking to preserve its bright, grassy essence.
4. Kitchen Tools You Need
While this one-pan meal is forgiving, having the right tools ensures even browning, perfect texture, and stress-free cleanup:
For even heating and effortless transfer from stovetop to oven, the T-fal 14-Piece Hard Anodized Nonstick Cookware Set is a game-changer—its oven-safe handles and warp-resistant base make browning kielbasa and onions a breeze before baking.
Need faster cleanup? The Deluxe 33-Piece Silicone Utensil Set won’t scratch your cookware and handles hot pans up to 600°F—perfect for stirring that bubbly cheese sauce.
Want to toast the top like a pro? Use a handheld torch or pop it under the broiler—but for consistent, hands-off browning, the Ninja Air Fryer Pro Crisp & Roast 4-in-1 gives a crispy, golden crust in 3 minutes at 400°F.
Once baked, store leftovers in the JoyJolt Airtight Glass Food Storage Set for up to 4 days—or freeze individual portions for future comfort meals.
5. How to Make Creamy Pierogi and Kielbasa Casserole
Phase 1: Sear & Sauté (10 minutes)
In a 9×13-inch baking dish or large skillet (oven-safe if using stovetop-to-oven route), heat 1 tbsp oil over medium-high. Add kielbasa slices in a single layer—don’t crowd them—and sear for 2 minutes per side until deeply browned and slightly crisp. Transfer to a plate. Drain excess fat, leaving just 1 tbsp in the pan.
Add diced onion and a pinch of salt. Sauté 5–6 minutes, stirring occasionally, until deeply golden and sweet. Stir in minced garlic and cook 30 seconds until fragrant. This step builds the flavor backbone—don’t rush it.
Phase 2: Build the Creamy Base (5 minutes)
Reduce heat to low. Whisk in ½ cup heavy cream, ¾ cup sour cream, 1 cup shredded sharp cheddar, ½ cup grated Parmesan, 1 tsp dried dill, ½ tsp smoked paprika, and salt to taste. Stir until just combined—avoid boiling to prevent curdling. The sauce should coat the back of a spoon.
Phase 3: Layer & Bake (30 minutes)
Sprinkle a single layer of frozen pierogi over the bottom of your dish. Top with half the seared kielbasa. Pour ⅔ of the creamy sauce over, spreading gently. Add remaining pierogi, then remaining kielbasa. Cover with remaining sauce, making sure pierogi are well-coated.
Bake, uncovered, at 375°F for 25–30 minutes, until bubbling around the edges and golden on top. For extra crispiness, broil 2–3 minutes at the end (watch carefully!).
Phase 4: Finish & Serve (2 minutes)
Remove from oven. Let rest 5 minutes (the sauce will thicken). Stir in 2 tbsp chopped fresh dill and a crack of black pepper. Serve warm with a dollop of extra sour cream and sliced green onions if desired.
6. Expert Tips for Success
- No sogginess — Keep pierogi frozen and unboiled. Thawing releases starch that makes the casserole gummy.
- Sauce safety — If your sauce seems too thick before baking, drizzle in 1–2 tbsp milk or broth. It will thicken as it bakes.
- Prevent drying — Cover loosely with foil for the first 20 minutes of baking if your oven runs hot—or if your pierogi aren’t coated in enough sauce.
- Flavor boost — Add a splash of apple cider vinegar (½ tsp) to the sauce. It brightens the richness without tasting acidic.
- Herb preservation — Always stir in fresh herbs after baking. Heat destroys their delicate flavor.
7. Variations & Substitutions
This creamy polish comfort food dish is highly adaptable:
- Vegetarian version — Skip kielbasa and add roasted mushrooms, sautéed kale, or chopped roasted red peppers. Use a smoked salt–infused sauce for depth.
- Gluten-free — Most frozen pierogi are GF, but always check labels. Use GF kielbasa or plant-based sausage.
- Dairy-light — Substitute cashew cream for half the heavy cream and use nutritional yeast + garlic powder for umami richness.
- Spicy twist — Add ½ tsp crushed red pepper flakes with the garlic, or stir in 2 tbsp harissa paste to the sauce.
- Cheese swap — Try smoky gouda instead of cheddar, or a blend of fontina and Asiago for extra meltiness.
8. Storage & Reheating
Store cooled leftovers in airtight containers in the fridge for up to 4 days. Reheat covered in a 350°F oven for 20–25 minutes, or until heated through. For a single serving, microwave 1.5 minutes, then finish under the broiler 1–2 minutes to revive crispness.
Freeze individual portions in the JoyJolt Glass Food Storage Set for up to 3 months. Thaw overnight in the fridge before reheating.
9. FAQ
Q: Can I use fresh pierogi instead of frozen?
A: Yes—but *parboil* fresh ones for 2 minutes (not full cook time), drain well, and chill 10 minutes. Fresh, fully cooked pierogi will turn mushy in the casserole.
Q: My sauce curdled. What happened?
A> Accidental boiling or adding cold cream to hot pan can cause separation. To fix: blender briefly until smooth, or stir in 1 tsp cornstarch slurry (1 tsp cornstarch + 1 tsp cold water).
Q: Can I make this in an air fryer?
A> Absolutely! Use a mini-cassérrole dish that fits in your air fryer (like the Compact 6-in-1 Digital Air Fryer by Amazon Basics does). Bake at 375°F for 20 minutes, then broil 2–3 minutes for crisp top.
Q: What sides go best?
A> Something fresh and acidic to balance the richness: try the Refreshing Peach Lemonade, or a simple arugula salad with lemon vinaigrette.
10. Conclusion
This creamy pierogi casserole is more than dinner—it’s a celebration of Slavic tradition with modern ease. It’s rich without being heavy, comforting without being boring, and endlessly adaptable to your taste or dietary needs. Once you taste that first spoonful—golden, cheesy, garlicky, with tender kielbasa and pillowy pierogi—you’ll agree: this is the kind of dish that becomes family legend. Tag someone who needs warm, cheesy, real comfort food tonight.
Print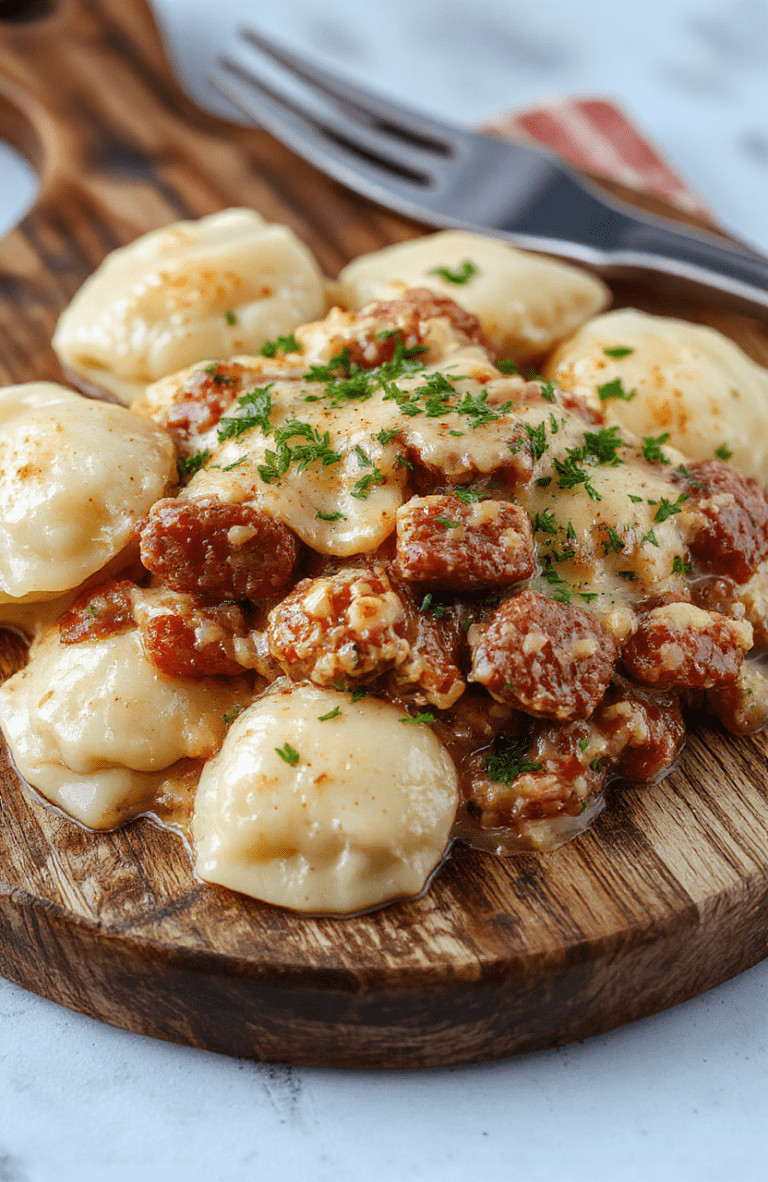
Creamy Pierogi and Kielbasa Casserole
A rich, comforting casserole blending Polish classics—creamy garlic sauce, juicy kielbasa, and tender pierogi—with a crispy fried onion topping.
- Total Time: 45 minutes
- Yield: 6 servings 1x
Ingredients
- 1 lb (450g) frozen or fresh pierogi (dumplings), thawed if frozen
- 1 lb (450g) Polish kielbasa, sliced into 1/2-inch rounds
- 1 tbsp olive oil
- 1 medium onion, finely chopped
- 3 garlic cloves, minced
- 1 1/2 cups (360ml) heavy cream
- 1/2 cup (120g) sour cream
- 1/2 cup (50g) grated Parmesan cheese
- 1 tsp dried thyme
- 1/2 tsp smoked paprika
- Salt and black pepper, to taste
- 1/2 cup (50g) crispy fried onions, for topping
- Fresh parsley, chopped, for garnish
Instructions
- Preheat oven to 375°F (190°C). Grease a 9×13-inch baking dish.
- In a large skillet over medium heat, heat olive oil. Add kielbasa and cook until browned (5–6 minutes). Remove and set aside.
- In the same skillet, sauté onion until soft (3–4 minutes). Add garlic and cook 30 seconds more.
- Stir in heavy cream, sour cream, Parmesan, thyme, smoked paprika, salt, and pepper. Simmer until slightly thickened (3–4 minutes).
- Arrange half the pierogi in the baking dish, top with half the kielbasa and half the sauce. Repeat layers.
- Bake uncovered for 22–25 minutes, until bubbly and golden.
- Top with fried onions and parsley. Let rest 5 minutes before serving.
Notes
- Use cheese-filled or potato-and-cheese pierogi for a vegetarian option (omit kielbasa).
- For extra crispiness, broil 2–3 minutes at the end.
- Storage: Refrigerate up to 3 days. Reheat in oven or microwave.
- Prep Time: 15 minutes
- Cook Time: 30 minutes
- Method: Baking
- Cuisine: Polish
- Diet: Not specified
Nutrition
- Serving Size: 1/6 of casserole
- Calories: 620 Kcal
- Sugar: 4g
- Sodium: 1380mg
- Fat: 46g
- Saturated Fat: 24g
- Unsaturated Fat: 18g
- Trans Fat: 0g
- Carbohydrates: 32g
- Fiber: 2g
- Protein: 24g
- Cholesterol: 95mg
