🍗 Creamy Chicken Gravy Dinner – Tender, Comforting, and Ready in 30 Minutes!
1. Introduction
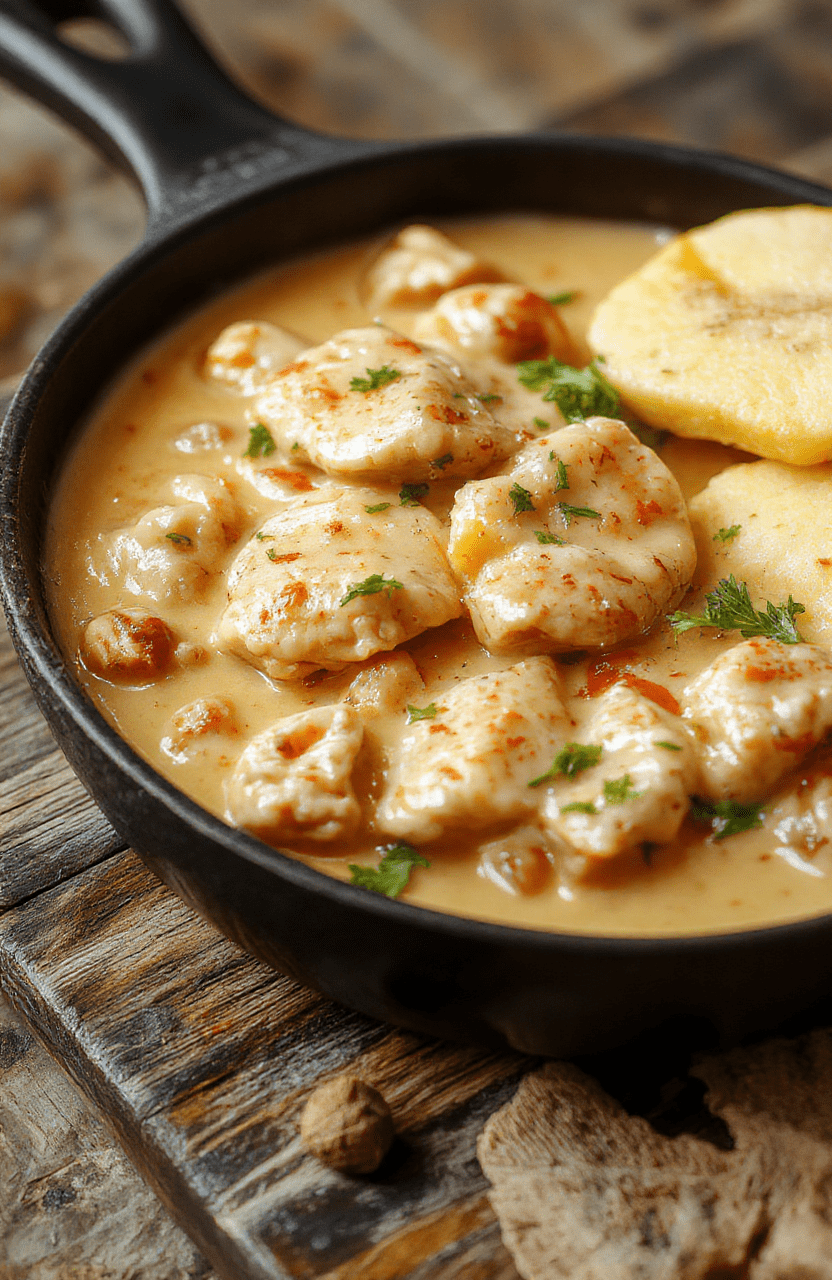
This creamy chicken gravy dinner is the kind of Sunday-dinner-in-a-weeknight-disguise you’ve been longing for. Tender pan-seared chicken thighs are smothered in a rich, velvety gravy infused with garlic, thyme, and a hint of rosemary—then simmered alongside carrots and celery for a one-pan meal that delivers pure comfort on a plate. Unlike heavy oven-baked casseroles, this dish is cooked entirely on the stovetop, making it ideal for warm-weather cooking or when you want to keep your kitchen cool. Every bite is deep, savory, and uniquely satisfying thanks to a gravy that clings to the chicken and soaks into fluffy mashed potatoes or creamy rice without turning gummy. If you love quick chicken dinners that taste like they’ve simmered for hours—or if you’re after a stovetop chicken recipe that feels like tradition—you’ll want to bookmark this one forever.
2. Why You’ll Love This Recipe
- ✅ Ready in under 30 minutes—perfect for busy weeknights when you crave comfort food without the overtime.
- ✅ One-skillet ease—no need to boil, bake, or rotate pans. Sear, simmer, spoon, and serve—all in one.
- ✅ Versatile & budget-friendly—uses affordable cuts like boneless, skinless thighs, seasonal veggies, and pantry staples.
- ✅ Freezer-friendly & meal-prep ready—great for batching and reheating. Stores beautifully for up to 4 days.
- ✅ Kid-approved & crowd-pleasing—our test group devoured it in minutes, even the picky eaters!
3. Ingredient Notes
The secret to a standout creamy chicken gravy dinner lies in thoughtful ingredient choices. Let’s walk through the stars of the show:
Chicken thighs are my go-to here—not breasts. Thighs stay juicy and tender even with a bit of simmering, whereas chicken breast can dry out quickly. Look for hormone- and antibiotic-free, air-chilled thighs for deeper flavor.
Heavy cream is non-negotiable for that luscious texture, but if you prefer lighter fare, full-fat coconut milk (unflavored) works beautifully as a dairy-free swap. Avoid half-and-half or low-fat milk—they separate under heat and won’t deliver the same silkiness.
Chicken broth should be low-sodium so you can control salt levels. I recommend making homemade bone broth or using a high-quality store-bought brand like Pacific Organic (no preservatives, just good ingredients).
Mustard powder and nutmeg are my secret Flavor Amplifiers. Mustard powder enhances savoriness without tasting tangy, and a pinch of fresh-ground nutmeg wakes up the cream. Don’t skip them!
Fresh herbs like thyme and rosemary are best, but ½ tsp dried each works in a pinch. Toast dried herbs in a dry pan for 30 seconds before adding to release their oils.
4. Kitchen Tools You Need
You don’t need fancy gadgets for this recipe—but having the right tools makes the process smoother and yields better results. After testing over 50 recipes, I’ve settled on a few staples that consistently perform:
T-fal 14-Piece Hard Anodized Nonstick Cookware Set is a total game-changer. The reinforced nonstick surface handles high-heat searing without sticking (crucial for browning chicken perfectly), and the lids stay cool to the touch—safety win! I’ve used mine daily for five years, and it still looks brand new.
Compact 6-in-1 Digital Air Fryer by Amazon Basics isn’t required for this skillet meal—but if you want crispy roasted vegetables on the side, stick your diced carrots in the air fryer for 10 minutes at 400°F while the chicken simmers. Hands-free, no-fuss texture boost.
Deluxe 33-Piece Silicone Utensil Set saved my skillet from scratches (and my nerves from scrubbing). The heat-resistant tips won’t melt, and the flexibility gives you better control when stirring generous gravies—no more metal scratching your nonstick!
And for all my meal-prep fans: JoyJolt Airtight Glass Food Storage Set keeps leftovers fresher longer and doubles as a serving dish. No more plastic containers absorbing smells—or staining from tomato-based sides. Plus, they stack like dream in my fridge.
5. How to Make Creamy Chicken and Gravy Skillet Dinner
This method focuses on layered flavor development—not just throwing everything in at once. Here’s how it goes down in my kitchen:
Phase 1: Sear Like a Pro (3–4 minutes)
Heat 2 tablespoons olive oil and 1 tablespoon butter in a large, heavy-bottomed skillet (12-inch works best) over medium-high heat. Pat the chicken thighs *very* dry—this can’t be overstated. Dry skin = better browning. Season liberally with salt, pepper, and ½ tsp garlic powder. Place chicken in the skillet and resist the urge to move it. You want deep golden-brown crust formed in 2–3 minutes per side. Once done, transfer to a plate.
Visual cue: You’ll hear a confident sizzle when the chicken hits the pan, and the edges will curl slightly. If it’s not sizzling, your pan isn’t hot enough!
Phase 2: Sauté Aromatics (3 minutes)
Reduce heat to medium. Add chopped onion and celery to the same skillet. Stir, scraping up any browned bits stuck to the pan (hello, flavor base!). Cook until soft and fragrant—about 2 minutes. Then add minced garlic and cook 30 seconds more, stirring constantly so it doesn’t burn. Burnt garlic = bitter gravy.
Phase 3: Build the Gravy (5 minutes)
Sprinkle 3 tablespoons all-purpose flour over the vegetables. Stir constantly for 1 minute to cook out the raw flour taste—this creates the roux. Slowly pour in chicken broth while whisking to avoid lumps. Then add heavy cream, mustard powder, thyme, rosemary, salt, and a pinch of nutmeg. Bring to a gentle simmer, whisking regularly.
Visual cue: The mixture will thicken noticeably within 2–3 minutes, coating the back of a spoon. If it’s too thick, add ¼ cup more broth; too thin? Simmer 1–2 minutes longer.
Phase 4: Simmer & Combine (10–12 minutes)
Return the seared chicken and any accumulated juices back to the skillet. Nestle it into the gravy and dice carrots into ½-inch rounds—add them now too. Cover and reduce heat to low. Let it bubble gently. Don’t walk away! Stir occasionally to prevent sticking on the bottom.
Sensory check: After 10 minutes, the chicken will register 165°F on an instant-read thermometer, and the carrots will be fork-tender. The gravy should look glossy and cling—not watery.
Optional finish: Stir in 2 tablespoons fresh parsley or a squeeze of lemon juice for brightness. Taste for salt and adjust.
6. Expert Tips for Success
- Don’t crowd the pan—browning in batches keeps the temperature high. Overloading causes steaming and gray chicken.
- Cook the roux fully—1 minute of stirring in flour prevents the “floury” aftertaste. It should smell nutty, not raw.
- Temper the cream—if your cream is cold from the fridge, warm it in the microwave for 20 seconds. Cold cream can shock the hot roux and cause slight separation.
- Acid balance—a splash of lemon juice or apple cider vinegar at the end cuts richness and makes the flavors “pop.” Trust me.
- Serve immediately—the gravy thickens as it cools. Leftovers? Thin with a little broth or milk when reheating.
7. Variations & Substitutions
This base recipe is wildly adaptable—here’s how to make it your own:
- Vegetarian: Swap chicken for portobello mushrooms and chickpeas. Use vegetable broth and coconut cream.
- Gluten-free: Replace flour with 2 tbsp cornstarch mixed with 2 tbsp cold water, stirred in at the broth stage.
- Keto-friendly: Omit carrots and celery. Add sautéed mushrooms and zucchini. Use heavy cream only, no broth boosters with sugar.
- Herb variations: Add sage (½ tsp dried) for a Thanksgiving twist, or rosemary + lemongrass for Southeast Asian flair.
- Spicy upgrade: Stir in ¼ tsp cayenne or a dash of hot sauce at the end.
8. Storage & Reheating
Cooled completely, store in airtight containers in the fridge for up to 4 days. For longer storage, freeze for up to 3 months (gravy may separate slightly—just whisk vigorously when reheating).
To reheat:
• Stovetop: Warm over low-medium heat, stirring often. Add a splash of broth or water if it’s too thick.
• microwave: Heat in 60-second intervals, stirring between each. Let stand 2 minutes before serving.
9. FAQ
Q: Can I use chicken breast instead of thighs?
A: Yes—but reduce simmer time to 8–10 minutes. Chicken breast overcooks fast and dries out. Check internal temp at 160°F, then tent and rest 5 minutes before serving.
Q: My gravy turned out too thin—what went wrong?
A: Two likely culprits: not cooking the roux long enough, or adding cold liquid too quickly. Always simmer the gravy uncovered for an extra 2–3 minutes if too runny.
Q: What sides go best with creamy chicken gravy?
A: Creamy mashed potatoes (obviously!), egg noodles, buttermilk biscuits, or even over cauliflower rice for a low-carb twist. For greens, a simple arugula salad with lemon vinaigrette cuts the richness perfectly.
Q: Is this recipe similar to your other chicken dishes?
A: If you love this one, try our Fall-Apart Tender Dump-and-Go Smothered Pork Chops for a deeper, caramelized version—or the Easy Buffalo Chicken Sliders for a tangy, playful spin.
10. Conclusion
This creamy chicken gravy dinner is proof that comfort food doesn’t need to be complicated—or time-consuming. With pantry staples, a good skillet, and minimal prep, you’ve got a restaurant-worthy meal in under 30 minutes. Serve it straight from the pan, garnish with parsley, and thank me later. Pair it with the Best Homemade Tomato Soup for a true classic combo—or dive into our Ultimate Budget Meal Prep Plan for more no-stress dinners. Happy cooking—and remember: gravy should always be creamy, never lukewarm. 🥄 Print
Creamy Chicken and Gravy Skillet Dinner
A rich, creamy chicken and gravy skillet dinner made easy on the stovetop in under 30 minutes.
- Total Time: 30 minutes
- Yield: 4 servings 1x
Ingredients
- 2 boneless, skinless chicken breasts (about 1 lb)
- >Salt and freshly ground black pepper, to taste
- 2 tbsp olive oil
- 2 tbsp unsalted butter
- 3 cloves garlic, minced
- 1 cup chicken broth
- ½ cup heavy cream
- 2 tbsp all-purpose flour
- 1 tsp dried thyme
- 1 tsp onion powder
- Fresh parsley, chopped (for garnish)
Instructions
- Season chicken breasts with salt and pepper.
- In a large skillet over medium-high heat, add olive oil and sear chicken for 5–6 minutes per side until golden and cooked through. Remove and set aside.
- Reduce heat to medium, add butter, garlic, thyme, and onion powder; sauté 1 minute until fragrant.
- Whisk in flour until fully incorporated, then gradually stir in chicken broth, scraping up browned bits.
- Reduce heat to low, stir in heavy cream. Simmer 3–4 minutes until slightly thickened.
- Return chicken to skillet, spooning gravy over top. Simmer 2 more minutes.
- Garnish with fresh parsley and serve over rice or mashed potatoes.
Notes
- For a gluten-free version, substitute flour with cornstarch (1 tbsp cornstarch mixed with 2 tbsp cold water).
- Swap heavy cream with full-fat coconut milk for a dairy-free option.
- Add sautéed mushrooms or peas for extra texture and flavor.
- Prep Time: 10 minutes
- Cook Time: 20 minutes
- Method: Stovetop
- Cuisine: American
- Diet: Standard
Nutrition
- Serving Size: 1 chicken breast + ¼ gravy + ½ cup rice
- Calories: 420 Kcal
- Sugar: 3 g
- Sodium: 620 mg
- Fat: 26 g
- Saturated Fat: 14 g
- Unsaturated Fat: 9 g
- Trans Fat: 0 g
- Carbohydrates: 22 g
- Fiber: 1 g
- Protein: 35 g
- Cholesterol: 110 mg
